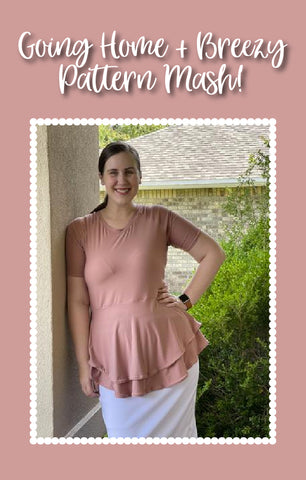
Hi friends! I love sewing and writing, so I’m pretty excited to get to contribute to Ellie & Mac’s blog today. I’m going to be showing you how I mashed together the Going Home Raglan and the Breezy Peplum dress.
If you don’t have either one of these patterns, you’re going to need to grab them. Don’t worry, these are two favorites of E&M customers, you really can’t go wrong with either one. The best thing is, this is such an easy mash. The Going Home was one of the first patterns I bought and I’ve made it so many times. It’s a classic style and perfect for any skill level. If you’ve never sewn a top before this is a great place to start. You could also make this work with the Straight Fit Raglan as well, although the fit would be slightly different. The Breezy is beloved, beloved I tell you! It can be a peplum or a dress of several lengths, so there’s a lot you can do with this one as well. And don’t forget there are kids versions of the Going Home, Breezy, and Raglan.
Are you ready?
First we’re going to cut out the skirt portion of our top. I like to cut the biggest piece first. I find that it’s easier to start with the biggest piece and then work my way down to the smallest piece. It helps me not have to fussy cut quite as much and I usually get the best use of my fabric this way. I decided to make my peplum a double layer. I cut out the first peplum at it’s intended length and then cut a second one that was about two inches longer. Obviously you can adjust this to suit your preference but I found this was a good balance for me. 

Next, we’re going to cut out the Going Home Raglan. I like the length of the Breezy bodice, so I measured it and for size L (the size I’m making) it’s 17 inches. I ended up cutting my raglan at 18 inches, but shortened it at the end by about 1.5 inches, so make of that what you will. You’re going to want to cut out the bodice front and back, sleeves to your desired length, and the neckband. The only change here is the length of the bodice front and back, everything else is the same. 
Assembly time:
Start putting together the raglan. In this case you will be following the pattern directions exactly. You’ll attach a sleeve to the bodice front, the bodice back to that same sleeve, the second sleeve to the bodice back and then put the whole bodice together. Attach the neckband according to the pattern directions and then sew up the side seams. 
Now you’re going to work on the skirt portion. Sew together the skirt at the side seams, if you’re doing a double peplum, sew together both skirts. Now you’re going to put the completed bodice right sides together with the skirt(s) and attach them. I found it easier to baste the skirts together if you did two skirt layers they can act as one while you’re attaching the bodice. I also prefer to baste the bodice to any skirt I sew before I go in for the serge, it’s easier to correct mistakes that way. When I tried mine on after attaching the bodice to the skirt I decided it would be a little more flattering if it were shorter, so that’s another good reason to baste.
And that’s it! Alternatively, you could cut a long rectangle, around 2x the measurement of your waist and just gather that and attach. I did that as well for some fabric I got from Amelia Lane Designs, but I like the way my Breezy mash ended up a little bit better.


I saw a very similar top on a fast fashion site, which was where I drew my inspiration for this top. Sure, the fast fashion top was actually really cheap, but then I wouldn’t get the pleasure of making it myself. What do you think? Will you make a Breezy Raglan Peplum? If you do, I would LOVE to see it! Tag me in the E&M FB group or on IG!
(Written By: Michelle Eisele)