Hi everyone, this is Marieke again. Today I am bringing you part 1 of my blog on the Duchess Jacket. It isn’t a secret that I love the Duchess Jacket Pattern! But it isn’t a secret I love hacks too. :) 
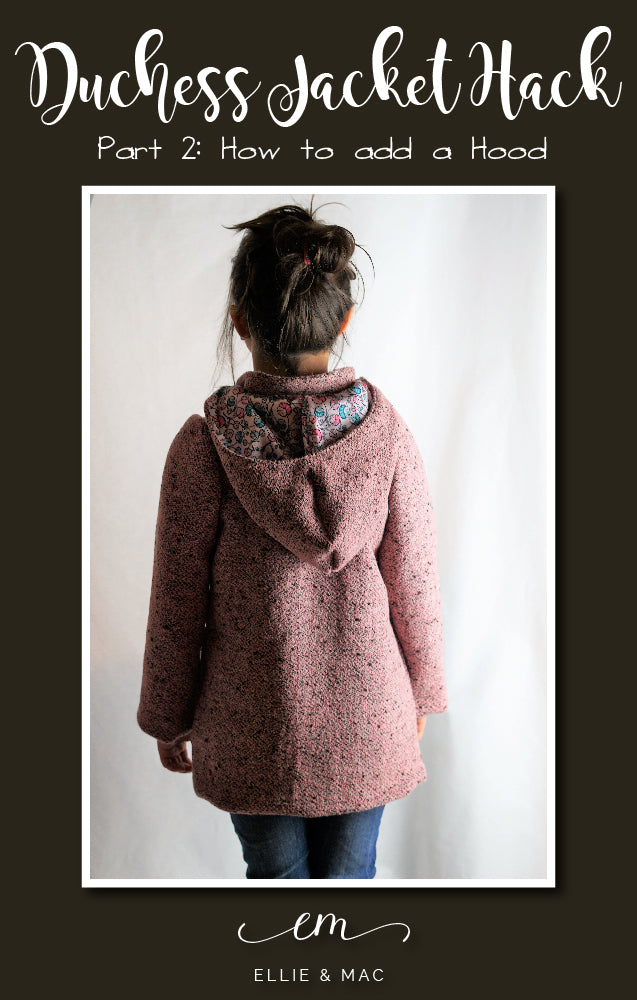
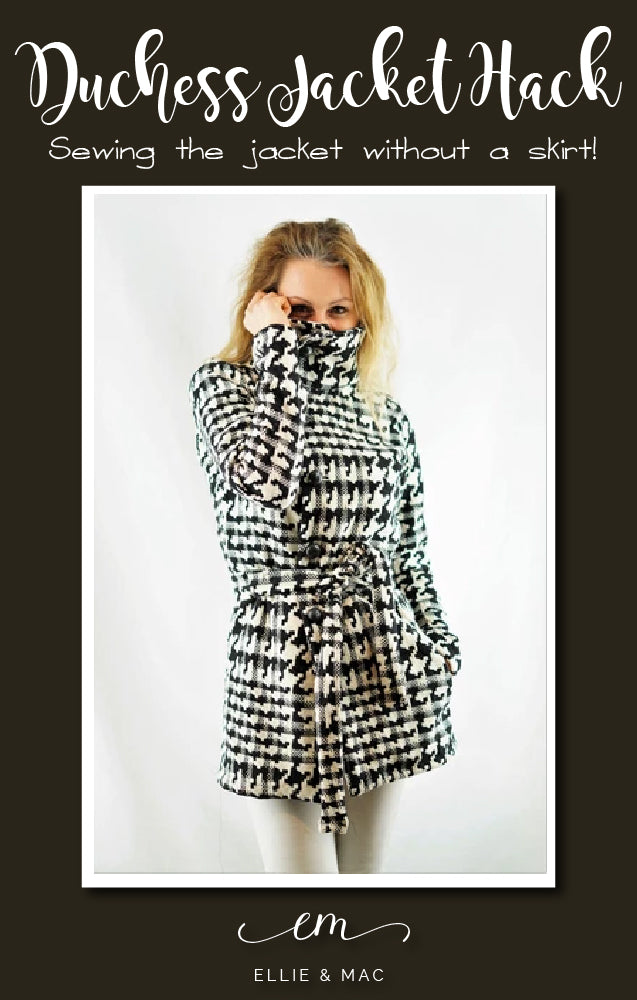
Well, it all started with some houndstooth fabric and I only had 1.5 yard. Way too less for a whole Duchess. I started thinking and ended with a houndstooth coat, left the skirt pieces out and added a big collar for me and a tweed version with a hood for my oldest daughter. No more stories, you can look at the pictures yourself too! I just want to share my hack with you.
What do you need:
- All the pattern pieces from the Duchess pattern, except the skirt pieces
- Extra paper
- Something to measure
- Something to draw and write
- Your Duchess instructions and all the extra’s from the instructions
Step 1 Prepare your pattern pieces.
Step 2 Tape both the front bodices and the back bodice on a large piece of paper. Make sure you align the outer seams straight with the paper.
*When making the women’s version, the front bodices aren’t straight. Fold or cut it straight and take the front side seam as reference. So you’ll have 2 front bodice pieces with a straight hem and follow step 2 and further in these instructions.
Your darts in the front are staying the same, but you are going to mirror the darts on the back bodice piece. Measure or cut them out and lay them straight down. Now you have 2 large, long darts that goes from nothing to the widest middle point down to nothing. (watch on the Ellie and Mac YouTube channel how to sew darts)*
Step 3 Measure the length you want to have and do that on all the 3 pattern pieces (the back bodice is cut on fold, that’s why it’s only one pattern piece ) For my daughter and me I measured from the natural waist to right over the hips. Don’t forget to add seam allowance at the hem.
Step 4 For a more curved body I like to make it a little bit wider at the bottom, but not much. For my daughter and me I added 1,5’’ extra to the hem and did that with all the pattern pieces. Draw a line from the hem to the waist. But yes, a straight line without any curves is absolutely possible too!
Step 5 Cut out your new pattern pieces.
Step 6 You can add the regular collar or like I did with my version: I doubled the width and took the curve out. When attaching a hood, you’ll need the regular collar pattern piece.
Step 7 The pockets are 1’’ down from the waist. Easily said: mark 1“ down at your new pattern piece. Mark them and sew on the pockets at your main front bodices and main backbodice. (Read my blog on the Ellie and Mac website “how to sew nice pockets“
Step 8 Follow the instructions from the Duchess pattern and sew the main jacket and your lining by closing the shoulder seams, the sideseams and attaching the sleeves.
Step 9 Well, that is looking good, isn’t it? Your main jacket and your lining jacket are done.
When you don’t want to attach a hood, you can continue following the instructions from the Duchess pattern. The large collar is been sewed on the same way as the regular. You are doing the same, leave a gap open at the side or the bottom to turn the jacket and topstitch it all the way around and automatically closing the gap. Add buttons and button holes and you are done!
Stay tuned for part 2 of this blog, a how to on adding a hood to the Duchess Jacket, it will be published this Wednesday.