![]()
Have you seen those beautiful hand painted wood signs that are so popular and thought “How can I do that?” Well, I am here to show you how to do just that. We are to make some great wooden signs using all those amazing Ellie and Mac cut files you have or wanted but didn’t know what to do. This is a fun activity to get the kids in on too.

Hand painted signs are fun gifts and easy décor additions. I am making this one today to give to my wonderful neighbor. Okay, lets dive in!
We are going to need some supplies, I will list what I used and the things to avoid.
- A sturdy wooden blank (round, square, etc) - I found mine at Hobby Lobby, make sure it is fairly thick and unfinished.
- Removable vinyl – I like sisser, Silhouette, or cricut vinyl.
- Transfer paper – it’s the only way to get your vinyl off the cutting mat without ruining your image.
- A latex based wood paint in whatever color you want your main background & your Lettering – you can get craft wood paint from specialty retailers/antique stores (like Country Chic Paint) or the great sample jars from Lowes/Home Depot (plenty of paint in those jars).
- Good craft paint like chalk or acrylic paints found at JoAnn’s, Michael’s & Hobby Lobby – make sure they are thicker and not water based (that will case bleeding).
- Some baby wipes – these help trust me!
- 2” chip brush & small art brush
- Foam make-up wedges – dense ones are better than those that are spongier (is that a word?)
- A paint pallet or something to put small amounts of paint on.
- Paper towels, a small glass of water & tweezers or toothpick.

Now, you will want to flip your sign over to the back and find the center back of your sign and make a mark with your pencil.
Next, we are going to paint our background...the whole sign front, back & side. You are welcome to sand your sign if you want a smother surface, it is not necessary unless really rough. If you do sand, I suggest nothing coarser than 220 grit.
When applying the background paint use the chip brush and light amounts of paint; brush with the grain. Once the sign is all painted you can now go over it with a baby wipe gently to give it a weathered look if you like.
While the background paint is drying, we can get our cut file ready.
It's important that your vinyl is removable vinyl, permanent vinyl will not come off without ruining the sign. Also, I have found that all vinyl is not equal. I have the best luck with Cricut, Sisser & Silhouette products. After you have picked your design and printed it, we have to be careful about how we weed the design. Remember, we are painting the area that we would normally leave when applying HTV or making a decal.
Before taking the design off of our mat we want to apply the transfer paper to the top of the vinyl. You will cut a piece just a bit bigger than you design and peel the backing off as you are smoothly applying to the design. Then take a credit card or scraper and firmly smooth the transfer paper to the design.

Now we can carefully remove the whole design (vinyl backing still attached) off the cutting mat. We will now find were we want the design to be on our sign. I used a round sign so I want my design to be fairly centered and as close to the edge as I can with the left side of my design. Also, you may find that you need to adjust areas of your design to fit by carefully cutting them from the main design (separate vinyl stencils).

Now that we have our design location, we can carefully roll the backing off of the vinyl. I say carefully because we don’t want to accidently remove those small but important areas like the center of letters or small but important details. If you see them lifting, no problem just press the backing back and make sure the vinyl sticks to the transfer paper.

Now, adhere your vinyl to the sign! Then we are going to re-press/smooth the transfer paper and vinyl on to the sign to make sure there are not any air bubbles and that the edges of our design are firmly on the sign. We can now roll the transfer paper off, again being careful that we don’t take any vinyl off with it. I like to go over with a scraper again just to make sure that the edges or secure so paint doesn’t bleed.


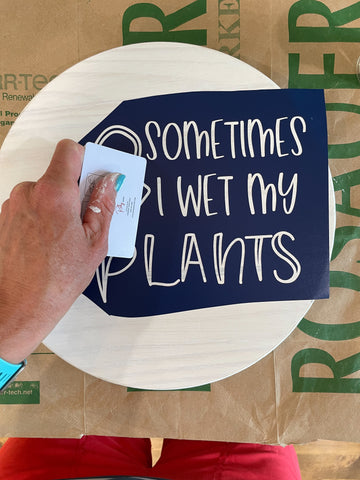
Now we get to paint! This is where the foam wedges, paper towel and paint tray come in. I used a black latex-based paint that I lightened with a little of the white from my background to soften the color. We dip our wedge lightly in the paint and then blot excess on the paper towel; next we apply to our design in blotting motions, not rubbing motions (that can cause the paint to bleed). You can always go back over with another coat if it is not dark enough. The acrylic/chalk paint can be used here as well now that the background has been sealed.


Once we are done painting, we don’t have to wait for the paint to be fully dry to remove the vinyl! You will also want a toothpick or tweezers to remove any little pieces of vinyl that are still on the sign. We can also start on other areas of our sign (i.e.; other details we need to add). I had to adjust my flowers to fit on the sign so I have to apply my flower vinyl now.


The flowers are an area where you may need to make a couple stencils depending on the details you want to have a guide to paint with. I was okay hand painting the centers of the flowers so I only made 2 stencils, one for the flowers and then one for the leaves. I chose to hand paint the watering can and inside the letters of ‘Plants” as well, but you could make another vinyl stencil and weed out these areas only to help guide you when blotting with a wedge or painting with a small brush.


Now our sign is complete and we just have a few small details left! We wait for it to fully dry and then flip it over and add our favorite way to hang them up...d-ring with cable, sawtooth hanger, etc.


(Written by: Krystol Ithomitis)