Hey friends! Sonia here today to show you 3 fun hacks for our FREE Snack Back Pattern! We'll be (1) adding snaps, (2) transforming it into a zipper pouch, and (3) creating a travel jewelry holder! Let's get started!
How to add snaps in place of Velcro
Cut your pattern pieces. Pick one and iron interfacing to the 4 corners of the piece, inside of your seam allowance.

Assemble as usual. The photo below shows how we put the 2 pieces Right Sides Together and leave a gap to turn. Clip corners, turn and press.

Keep assembling per patter, including closing the turn hole with topstitching, and stitching the sides to create the pocket. Now, just add snaps (per manufacturer's instructions for your snap set) and you're done!
Tip: Use an Awl to punch your holes in the flap corners, then use a marker to mark through the hole for placement of the other side of your snap. This will ensure they align perfectly!

Here's the finished product!

Making a Zipper Pouch
Cut the two pieces (outer an lining) with your pattern piece. Then fold them in half (short edges together) and mark the center.

Cut both pieces, so you'll have a total of 4 now.

Place one of your exterior pieces right side up. Align a zipper wrong sides up with the left edge, pin and stitch.

Next, place a piece of lining along the same edge, lining everything up evenly. Stitch again, on top of the stitching line you just sewed.

Pull fabric away from zipper (wrong sides together now) and topstitch.

Repeat for the opposite side!

Next, UNZIP your zipper! Fold fabrics right sides together now, with both exterior pieces facing each other, and lining pieces facing each other. Pin/clip.

Sew, leaving a gap in the lining to turn the pouch out. Trim threads, corners, and zipper tails prior to turning.

Pull the lining closest to you and clip the turning hole, then sew shut.

Tuck the lining in, poke out your corners, and you're done!

Creating a Travel Jewelry Holder
**I added snaps to this one too - if you wish to do that, add your interfacing to the wrong side corners now like we did in the first hack. If not, you'll likely need to make your loops for jewelry longer, so that they hang down below the velcro.**
Cut as many pieces of bias tape/ribbon as you would like jewelry hangers. I am using the small pouch, and added 4 loops of bias tape. Make sure that they are placed far enough away from the edges to leave room for snaps, and distribute evenly.
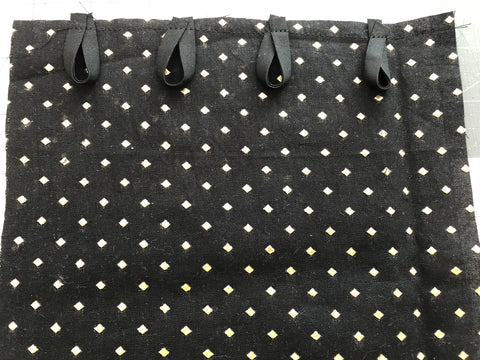
Assemble pouch as usual, (two pieces stitched RST and turned out) with the only difference being that when you topstitch, fold your loops towards the inside of the pouch so they are stitched down.

You can now hook necklaces/bracelets to the loops and tuck them inside the pouch! You can, if you'd like, topstitch vertical channels so each piece of jewelry doesn't overlap, but I find that having them hooked at the top is sufficient for avoiding tangling.


Hope you enjoyed these quick hacks, these are fun ways to personalize your snack backs and change them up. They also make great gifts!