Hey everyone, Suzanne Todd, back again with another fun hack using the Ellie and Mac Slow Sunday PDF Pattern
Slow Sunday is one of my favorite tank top/dress patterns and such a good pattern on its own, but such a versatile pattern to hack in many ways.
Here are a few of my previous blogs:
If you look through the blogs, you will find that I have used it as a base for a few different looks. But today I have a super fun one for you!
I'm a big fan of one of the better known, higher end, very colorful, ready to wear designers (you can guess which one it is, LOL!) and am always looking for ways to recreate that look. Enter ruffles! Yep, ruffles! They are everywhere right now, so on trend! And I just love them!!
So, lets jump right in.
Begin by simply stitching up your favorite version of the Slow Sunday PDF Pattern.
I chose the racerback tank top and used bamboo Spandex from Oh So Pretty Custom Fabric.
It is good quality fabric with just the right amount of drape and stretch to create a super comfy and stylish top that holds its shape well. Plus, I am a sucker for pink!!

Ruffle:
-
Cut a strip 2X (or double) the length of the neckband and 2” wide. The hem (or rolled hem) will take up ¼” on each side leaving the ruffle 1 ½” wide. This seems to be perfect for mine, but feel free to adjust as you like.
In this case, my original net band was 23 “so I cut this ruffle piece at 46”.

-
I added a rolled hem to the edges. You could also do a regular ¼” hem, your choice, but the rolled hem does adds a pretty detail. I think it would be pretty in a contrasting thread color as well.

-
Sew the 2 short ends together forming a loop, as you would for a normal neckband. I like to use a regular machine and press the seam allowance open, so it lays flat.

-
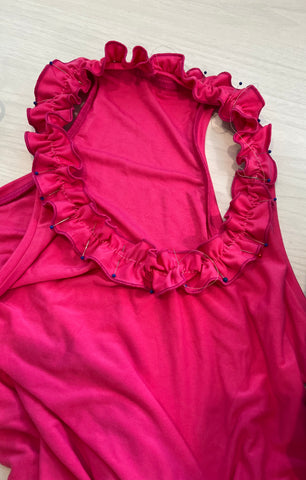
Sew a long gathering stitch down the center of the strip. Mine is shown above using a contrasting thread for visual purposes, but I suggest using a matching thread as it can be tricky to remove. Be sure you're sewing this seam straight down the middle of the piece. This will help keep the ruffle even once it's attached.
-
Keeping the ruffle flat, meaning- not folded in half like a neckband, mark the quarter points. Do this as well for the bodice neckband (you will have attached it normally as called for in the pattern). Pin these 2 pieces together just as if you were matching the quarter points for a neckband, except it is a ruffle and it is a flat piece.

-
Begin gathering each quarter area to fit exactly to the neckband length and pin in place. I like to use my gathering seam line as my guide and pin it directly to the seam between the bodice and neckband. This helps keep it straight.
-
Go all the way around gathering and pinning as carefully as you can; striving to keep the ruffles as even as possible.
-
Attach the ruffle using a regular sewing machine stretch stitch. Go slow. It can get tricky keeping the ruffles even. This technique is not my strongest point, LOL. My ruffles are somewhat even, but no one else will ever know.

-
Remove basting stitch as best you can, hence why matching the thread matters, LOL.
You should have covered it up with the stretch stitch and this may not be possible, try it anyway. I was able to remove mine, just took some time.
And there you have it!
It’s a simple technique that could be applied to most any neckline, so try it out and let me know what you think!
Hope you enjoy this fun hack!
(Written by: Suzanne Todd)