So, a couple of weeks ago, I was scrolling through some webshops, and encountered a dress I just had to try and recreate... I just knew there would be an Ellie&Mac pattern that I could use as a base. Someone in the Ellie&Mac Facebook Group brought the Oasis Swimsuit to my attention. It was the perfect starting point to make my pinspiration come true!
I printed the Oasis Swimsuit bodice, style 1, size SM and first made a muslin.
For the skirt I added approx. 38" in length. For the first tier, I drew two rectangles of 9" 7/8 by 27"1/2.
For the middle tier, I drew three rectangles of 13"6/8 by 27"1/2. For the last tier, I have cut four rectangles of 16" by 27"1/2.
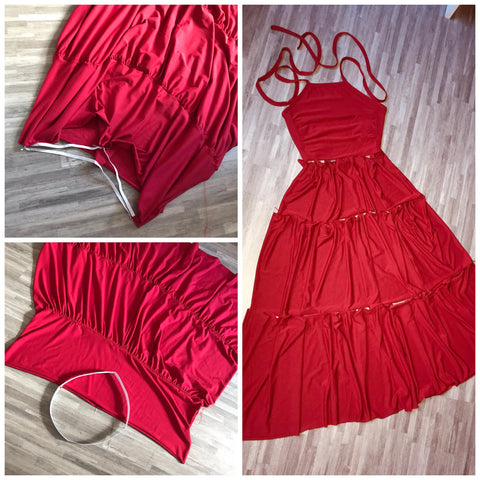
After trying on my muslin, I noticed the weight of the skirt was pulling everything down. So for my final attempt, I adjusted the pattern pieces just a smidge, as you can see on the pictures below. I lengthened the side seam, so the bodice comes up a little higher on the sides. I added 1" on the front bodice, and 1/2" on the side seam of the back bodice.

Constructing the bodice
To construct the bodice, I have cut out the front bodice twice, as you are supposed to. I wanted it to be fully lined, to give it more stability and coverage, and to get a clean finish on the strap bands. So I cut out the back bodice twice (mirrored), instead of only once. I also cut out the style 1 neckband and the two straps that wrap around your body.
I have not cut out the hem binding, since I was attatching a skirt.

You first sew gathering stitches on the side seam of the front bodice. So I did on both front bodice pieces. I gathered the sides to match the back bodice parts. Then I attached the back bodice parts to both of my front bodice parts, creating to identical pieces.

I placed those pieces on top of each other, right sides together, to stitch the sloping sides together, that will go under the armpit.
After doing so, I have sewn the loops (4 of them, each 2" by 3").
I folded my bodice open, and placed the loops on the marks I had made. Then folded the bodice pieces back, right sides together, so the loops were sandwiched in between. I did a stay-stitch and then stitched the sides together.
I turned the bodice inside out.


Time to attach the neck binding!

And on to the last part of the bodice construction: the straps. I used the straps, as the manual says, to create the third loop. You use the binding method again to create the straps.

Creating the skirt
To create the skirt, you first sew the two top tiers together along the short sides, to create a continuous loop.
You do the same for the three middle tier pieces, and repeat your actions with the four pieces of the bottom tier.
Next I hemmed the bottom tier. Then I sewed gathering threads at the top of that tier. I gathered it to match the length of the middle tier, and I sewed the bottom tier to the middle one. Now you sew gathering threads on top of the middle tier, gather it to match the top tier, and sew those together as well.
At the top of the top tier I sewed an elastic band. I cut that elastic 1/2" shorter than my waist measurements, and overlapped another 1". This so that the elastic can support the weight of the skirt part. I divided the elastic into four equal parts, and did the same with the skirt part. Then I sewed the elastic into the skirt with a zigzag stitch, which also gathered the last top layer.

Attatching the bodice and skirt
To attatch the bodice to the skirt, I marked the middle of the front bodice, as well as the middle of the skirt.
I aligned the raw edge of the bodice with the raw edge of the skirt, laying them right sides together.
Without stretching, I now pinned the rest of the bodice to the skirt. Your bodice will not be pinned all around the skirt, there will be a part of the skirts raw edge still visible. I used my serger the sew all around the skirt opening, whilst attatching the bodice to it.


Now to get rid of that raw edge on the back and finish my dress!
I pulled the bodice up, now showing how the dress will look on front. I folded the seam allowance down, and pinned it all around the skirt opening. All I now had to do, was stitch it secure with a zigzag stitch. On the front, this helps for extra stability, and on the back, you this way get a clean finish.

Et voila: I made my pinspiration come true, thanks to Ellie&Mac :)
An additional advantage of the Oasis Swimsuit pattern is that you can easily add padding to the bodice (it's all in the manual!), because the open back does not really go well with a bra of course...

I love this dress, although I have no occasion to wear it to...
But I now have it ready and waiting for action :)


If you want to give this a shot yourself, you can find the pattern here (aff.link)
Feel free to join me on my Instagram profile to see what I'm up to next ;)
Or follow my blog: https://mijn11jesenik.com/
Fabric: red jersey bought at driessen.nl (no aff.link) .
Links:
my aff. Link https://www.ellieandmac.com/products/adults-oasis-swimsuit-mix-match-pattern?_pos=1&_sid=f0c9bbc77&_ss=r&aff=464
IG link: www.instagram.com/ingelrelst
Link to blog: https://mijn11jesenik.com/
Link to fabric: https://driessenstoffen.nl/en/product/uni-tricot-dark-red
(written by: Deborah Ingelrelst)
If you're a beginner, check out our free sewing patterns here.
See our video tutorials for beginners here.


