Welcome back to the second installment of our Going Home Sweater.
In part 1, I showed you how to add swing to the hips….a technique that really can be used for any shirt pattern. Here in Part 2, I’ll explain how to add the lace up front.

Without further ado, let’s begin!


First, we’ll need to alter the neckline of the front bodice. It has a slight curve down from the shoulder and a rectangular box at the bottom. Decide how low you want the lace up to go. I held the pattern up to myself and chose to start it roughly in the middle of my bust. Next, draw a straight line over 1”. This will be the bottom “box” of your grommet neckband.
Let go up to the upper shoulder point now so we know where the line is going to stop. I marked approximately 1” down from the upper shoulder point. Now mimic my image above and draw a gentle curve down to meet the 2 points (the upper shoulder and the 1” over from center bust)
The amount we took off the upper shoulder point will also need to be removed from the front of the sleeve. Measure down the same amount (approx. 1”) and draw a slight curve from that point up to the back shoulder on the sleeve.


You can now cut along the new lines you’ve created so you’ve got 2 new patterns pieces. An adjusted front bodice and adjusted sleeve.


Cut out your fabric and follow the instruction for assembly up until the neckband (so sleeve and side seams)
As show in the picture above on the right, use a clip to mark the top of the straight sides of the rectangle. Basically, right as it begins to curve. The portion of the band that attaches here doesn’t need to be stretched.
Now for a little math….don’t freak out...I promise I’ll walk you through every step.

Fold your bodice exactly in half. Measure from the clip straight down to the corner of the rectangle (marked as A on the image above). Mine was 4.5”. There are 2 sides of the rectangle so multiply that number by 2.
My number is now 9”. Write that down...now we’ll calculate the rest of the neckband.
You’ll now measure from the clip to back center (marked as B on the image above).
Mine was 15”. Since it’s folded in half, we will again multiply that by 2. My number is now 30”.
Now you want your neckband smaller so it has to stretch a little to fit the neck opening.
So, take your number (mine being 30) and multiply that by .80. I now have 24”.
I calculated by .80 (or 80%) because the rib knit I was using is very stretchy. If you’re fabric is less stretchy (maybe a french terry for example) you may want to multiply by .85 (or 85%).
Let’s recap that math. My first number is 9” (for the sides of the rectangle) and my second number is 24” (for up and around the neck). Add them together and now I have 33”.
One last thing is to add in the seam allowance. Since our seam allowance is .25” and there are 2 ends to the neckband we will add .5” to our final number of 33”.
Our grand total being 33.5” for our grommet neckband.
Cut a strip of your fabric with the stretch running the long way 2.5” by your final number.
In my situation it would be 2.5” x 33.5”.
Whew! You’ve got this...you’re so close.

Using the clips at the curves as your ends, mark the quarter points for the rest of the neck opening. We will be doing the same in a minute to the neckband so you’ll be able to evenly stretch it.

Clip ¼” in on each corner of your rectangle. Be very careful not to clip more.
Side note: I added a 1” by 4.5” strip of interfacing to each end of my neckband. It can help with the grommets but after the fact, and realizing the grommets go higher than the curve, I found it wasn’t totally necessary. The grommets aren’t getting pulled on so as long as you are careful in the installation of the grommets you will be fine without the interfacing.
Place each end of the neckband along the bottom of the rectangle as show. The folded edge should meet in the middle and you’ll have a little hang over each side (for the seam allowance up the neckband). Make sure the neckband isn’t twisted. Baste it in place using a ¼” seam allowance. I also used a little bit of wash away wonder tape to hold it while I basted.

Flip the neckband up and clip it up the straight sides of the rectangle until you reach the clips at the curve. Do not stretch it.
Using the clips at the curve as the ends, mark the quarter points of the rest of the neckband as you did for the neck opening.
Match up the quarter point clips on the neck opening to those on the neckband.
You’ll now serge (or sew) on the neckband). Starting at one corner, serge (or sew) up the straight side and around the neck ...remember to only stretch the neckband after the curve clip.

The wrong side of your shirt should now look like this.

Now we’ll serger the bottom of the rectangle where we had originally basted. This will finish off our neckband.
Tip. The corners can be tricky...be aware of where your fabric is as you serge near the corners so you don’t get any puckers. Also remember, a good press will do wonders for the corners. Don’t judge it right off the serger. Get the iron out and press it well first.

Now that your neckband is attached and pressed, we can move on to the grommet installation.
(side note: you can top stitch around the neckline if you prefer)
I marked 1.5” up from the bottom and every 1.5” after that on either side. I started with only 4 grommets on each side. Tried it on and decided I wanted one more.
Use pins to mark your grommet spots so you can make sure you install them evenly.
Install your grommets as per the package instructions. I used 1 ¼” grommets...also labeled “large eyelets”.
For the string, you can use a variety of things...twill tape, cording, ribbon, paracord ...or you can take a 1.5” by pretty long (i know i know...i didn’t measure it but made sure it’d be longer than I needed) and create your own string. Serge right sides together and then flip it right side out.

Lace up your grommets and stand back to look at your awesome work.
There are a few ways you can lace it up that I found on the internet but this is the version I settled on.
Try your new shirt on and trim the cord as per your preferred length. I like to tie a knot near the end of mine.
Oh...don’t forget...you still have to hem!

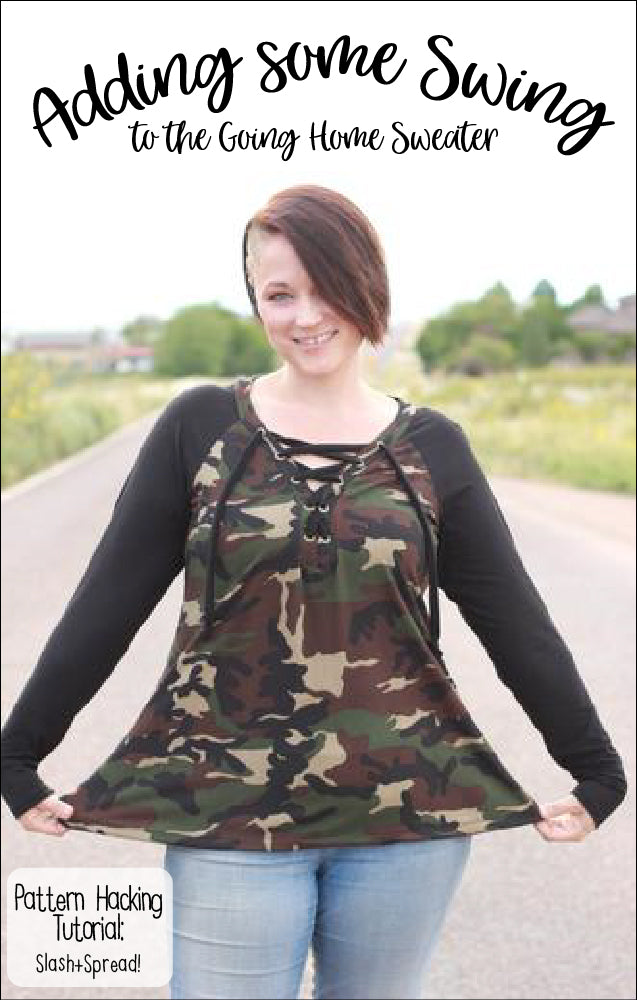
Now you can enjoy a super cute lace up Going Home Sweater!
Happy Sewing!
-Sam