Now that we have our pattern pieces needed to create the hidden kangaroo pocket, you can now cut out your fabric. Listed below is what you will need to cut out to achieve this hack.
- cut 1 front bodice with pocket openings on fold
- cut one front pocket piece on the fold
- cut 1 back pocket piece on the fold
- cut 2 pocket bands (not pictured)
- cut other remaining pattern pieces to complete your top or hoodie

Step 11: Take your back pocket piece and lay it right side up

Step 12: Lay your front pocket piece onto the back pocket piece, right sides together. Pin/Clip. Sew using your preferred stretch stitch or serge.

NOTE: This is an optional step, but if you prefer the pocket to stay in place, you can use a Permanent No Sew double sided fusible tape here. My local Hobby Lobby carries this. Apply the tape along the seam of the top of the front pocket that is marked in red in this photo. Be sure to fuse it to the wrong side of the front pocket piece. We will fuse it to the wrong side of the bodice in a future step.
Step 13: Lay your front bodice, with wrong side facing you. 
Step 14: With the back pocket piece folded up and out of the way, lay your front pocket piece onto your bodice with wrong sides touching.
Step 15: You can baste or pin your front pocket piece to your front bodice, which ever you prefer along the red lines.
Step 16: Take your pocket bands and fold them with wrong sides touching. Pin/Clip
Step 17: Find the center of your pocket bands and your pocket openings. Mark these with a pin or clip. I like to use pins that are pink to mark my centers. Repeat for other side pocket.
Step 18: With the back pocket piece still folded up out of the way, match your center marks on your pocket bands and openings, pin in place. Line up the raw edges of the bands to the raw edges of the pocket openings, pin in place. Stretch and pin the bands in between the center and the raw edges. Now sew along the red lines with a serger or your preferred stretch stitch. Press. Top stitch. Repeat for other side pocket.
NOTE: if you are doing the piping, you can skip the top stitching here to save you an extra trip to the cover stitch or sewing machine, and just top stitch your pocket bands and piping at the same time.
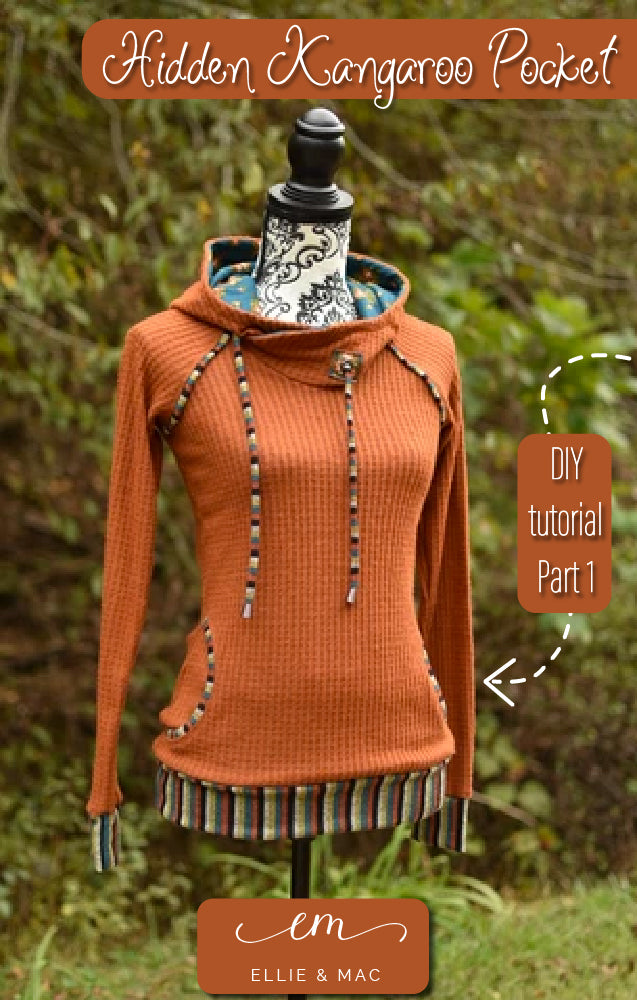
As promised, here we will be adding the piping to the raglan sleeve! I told ya I would add an extra tid bit!
Step 19: Measure the armscye of your raglan sleeve. Your piping will be a 1:1 ratio, so no stretching is needed. The length your armscye measures, is the length you will cut your piping at. I used a width of 1.25”. So cut 2 bands the length of your armscye x 1.25”
Step 20: Fold your piping in half length wise, with wrong sides touching. Pin/Clip.
Step 21: Pin your piping to your armscye. Remember, there is no stretching here! You can pin or baste your piping here, whichever you prefer. 
Step 22: With bodice right side up, lay your sleeve onto your front bodice with right sides together. Your piping will be sandwiched between your front bodice and your sleeve here. Sew using your preferred stretch stitch or serge along the red line. Repeat for other sleeve.
Step 23: Lay your front bodice with your sleeves attached with right side facing up. Press your pocket openings and your piping. Top stitch along the red lines using your preferred finishing stitch or cover stitch.
Step 24: Now attach your back bodice to the sleeves. Lay your back bodice onto your sleeve with right sides together. Pin/Clip. Sew along red lines. Repeat for other side of back bodice and sleeve.
Step 25: Line up the raw edges of your front bodice, front pocket and back pocket. You can pin in place if desired. Sew a bar tack stitch within the side seams along the red line. Repeat for other side pocket.
NOTE: if you used the Permanent No Sew double sided tape to keep your pocket in place, here is where you will fuse the wrong side of your front pocket to the wrong side of your front bodice. I suggest fusing from the backside of your front bodice and use something to protect the fabric from the heat.
Step 26: Now lets sew up the side seams shall we. Make sure you sew up all the raw edges of the front and back pocket pieces here as well. Pin/Clip your side seams and sew along the red lines. Repeat for the other side.
Step 27: When you attach the waist band, be sure that the bottom hem of the front and back pocket pieces are sewn up in the seam as your attaching the waistband. This will close the bottom of your pocket! 
Now, follow the instructions for the pattern you are using to compete your sew and hack! If you want to attach a hood to the Going Home Sweater, I highly suggest the Be Creative Hood! Its a perfect fit and no need to adjust anything! Thank you so very much for joining me in on this fun hack! I look forward to seeing all the beautiful tops and Hoodies! I would absolutely love you to post in the Ellie and Mac Sewing Pattern group when you’ve competed your sew!