Hi everyone, Cheryl here. I am so excited to be a guest blogger here at Ellie and Mac and I am glad you can join me! I am a stay at home mom of three busy toddlers, a 3 year old son and twin girls who are 19 months.
I want to talk to you today about the idea and process behind upcycling previously loved kids clothing from the thrift store (or even your stash) into new fresh looks for your children.
I have always been frugal and I love to find a good deal, like really love it! I guess I can thank my parents for that, for teaching me to be wise with my money. On the top of my list, is to scour thrift shops for one of a kind items. I realized after a year of sewing clothing for my kids, that we have all these items in our house and at thrift stores that we no longer use due to growing out of, fit issues, rips, fading, and even style changes.
Most of these items that are in very good condition still, end up at the local thrift stores. One day while shopping, I noticed this great shirt in the boys section that was 5 sizes too big for my son. I bought it! For $1.50 I couldn’t walk away and figured I would store it for 5 years until he fits it (little secret about me...I like to hoard items too)!
After I washed it at home I had an “ah ha” moment. Why couldn’t he wear this now? I thought for sure he totally can, I just need to make it his size! Well, I did just that, I made it his size so he could wear it right away! From then on I was totally hooked on upcycling my thrift store finds! I could reuse these items, and turn them into new fabulous items for a fraction of the cost of buying new or buying fabric even! My heart (and wallet) were so happy!!
So, let’s get to the fun stuff:
Guidelines for maximizing your time/money at the thrift store:
- Have patterns/sizing in mind when shopping. Patterns with color blocking are great for upcycling shirts/dresses with appliques, wording or designs on them, as they are technically panels waiting to be sewn up. There are so many Ellie and Mac patterns that could be used for upcycling. Here are a few of my favorites for panel style upcycles: Kids Discoverer Tee, Be Creative Hoodie, Girls Everywhere Dress, Kids Raglan Top and Kids Half Pipe Tee. Technically any pattern can be used for upcycling it all depends on what you want to accomplish with the items you found.
- Look at larger sizes as you will need to be able to fit the pattern nicely on the clothing piece. For example, my son is currently in size 3T rtw, so I shop for at least 6T and up, and in the men’s section for him. My daughters are in size 18/24 month rtw, so I shop for at least 3T and up. I will even shop in the women’s section for them, as one dress can get me one for each of them. (yes I am one of those twin moms who like them to be matchy matchy most days...hey I’m going to milk it until they are old enough to tell me NO).
- If you are buying plain solid color shirts/dresses to simply cut up and reuse as plain solid color fabric, shop bigger/largest sizes you can find. I have bought plain solid color shirts and used them as sleeves and it has worked great.
- Look for items with zippers/buttons/ribbing etc, things that are unique that can be taken off and reused. If the items are really cheap they can be cheaper than buying those sewing notions new.
- Look in the sewing/craft section of these stores as they tend to get in donations of brand new fabric and sewing notions.
- Heck even look in the bedding section, as sheets, pillow cases and blankets can even be used for some clothing.
- Always keep in mind the material. What is the item made out of, is it woven or knit and how much stretch. This will determine what patterns you can use for upcycling. Also a good thing to be aware of is two or more pieces could make up one new upcycled item.
- And last but not least, if you see something you really like but are not sure what to make with it...buy it anyways!! (hmm...maybe that’s why my sewing room seems smaller and smaller each week..oops!)
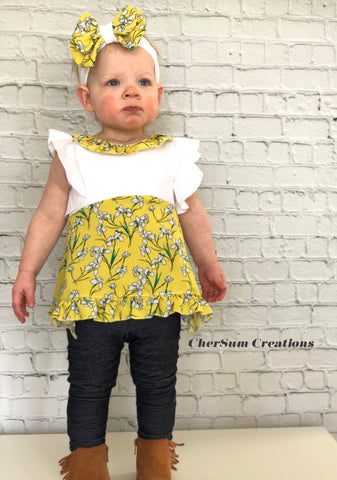
This is an item I found at the thrift store for $3.00. I found it in the girls size large section and I fell in love with the print right away. I knew it needed to be some sort of dress/tunic/peplum for my girls when summer shows up. So it came home with me and I decided on it for my newest project as part of this blog! 
Now let’s get the creative juices flowing and create our upcycled item
First things first, wash your items. Then start looking over your item(s) and patterns to help you envision what the “new” upcycled item will be. This process for me usually takes longer then sewing the actual item, and sometimes I need to put aside and revisit with fresh eyes to really see what is possible. But most times, as I am deconstructing the item or even sewing up the new upcycled item, that is when my inspiration/creativity really starts to flow.
For the shirt I found, I didn’t have an exact idea in mind at the store, but once I looked through my EAM patterns and the fabric requirements I decided on the Kids Be Dreamy Dress. Knowing the fabric requirements of the Kids Be Dreamy Dress I decided to use cotton spandex/lycra from my stash for the bodice and use the shirt as the skirt portion. (keep in mind you may need to size up or make modifications if it doesn’t have the required amount of stretch)
- The first steps I take are printing, assembling and cutting the pattern just like I would with any project.
- Next I lay out the item of clothing and play with the pattern placement. Once I did that I realized I wouldn’t be able to get the maxi dress out of the item as it wasn’t wide enough, so I decided to just work with what I had and make it a tunic/peplum length Kids Be Dreamy Dress. Therefore, I did have to hack the pattern a bit. I made the dress shorter to fit the width of the item and made the bodice a tad longer.
- Once I have my new pattern pieces, I start to deconstruct the item. I usually cut up the side seams and around the armscye, that way I end up with a front, back and two arms. You could also unpick the seams/stitches….but really...who has time for that!
- I also save any items I can for future projects, for example this one had a perfectly good 7” zipper on the back half of the shirt, so I unpick the stitches to keep that in tact. If your item has buttons, remove them, drawstring, remove it, elastic even can be reused.
-
As I was deconstructing my item I realized it had perfectly good ruffles so I decided to add a few ruffles to my Kids Be Dreamy Dress, I carefully unpicked the ruffles and removed the binding.


- Once everything was pretty much apart I had all the pieces separate, the zipper, ruffles, sleeves, front and back bodice.


- When I have everything apart, I start laying out my fabric pieces and pattern pieces. Because the back of the shirt had a middle seam, I decided to use that for the back of the skirt. I then used the front of the shirt for the front of the skirt. I do this the same as I would with any fabric, the pattern for skirt is cut on fold, so I fold the item in half and make sure I am cutting with grainline properly lined up.


- And finally when all my pieces are cut out, I proceed with sewing using the tutorial as needed to complete the project.
- I had so much left over material from the thrift store shirt that I decided that my new upcycled item needed a matching Be Posh Headband
- Last and the most important…I give a little smile and admire my upcycled creation!


Here is another upcycled item I did for my son. I bought a size 8-10 to get him a size 3. I removed the appliques from the original shirt, used the front and back only from the shirt and added some fabric from my stash for the arms. When sewing together the new upcycled item I then re-added the appliques but in different spots. And Ta-Da...it’s love! 

If you are upcycling for yourself or for an adult loved one, remember to follow most of these same ideas. And most importantly have fun doing it!
Do you now feel inspired to dig through those racks at the local thrift stores or even the unworn items in your closet? I hope so! I can’t wait to see your beautifully creative upcycled items!
Follow me on instagram @chersum_creations
Written by: Cheryl Summerly
Disclaimer: All the above links to patterns are affiliate links, which help support my upcycling addiction