![]()
A few weeks ago part one of how to modify the Duke Jacket to include hook and loop tape, a zipper and a chin guard was released with the heads up that part two would be released soon. The time has come for the release of part 2! In this post we’ll look at how to add an identification tab and hood onto the Duke Jacket.
Hook strip and identification/size tab:
-
Take the rectangle cut for the hook strip, fold in two, longest sides together, and press.
-
Open it and fold the longest sides toward the center. Press.

-
Fold it again, longest sides together, topstitch along each side. A 2” wide strip should now measure 1/2" in width.

-
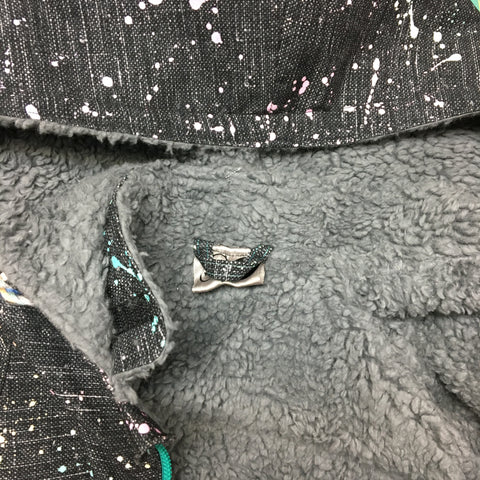
Prepare your identification tag (fold it, write on it, put some HTV on it, etc.)
-
Pin it to the center right side of the liner back piece.
-
Give the hook strip a U shape.
-
Clip/pin it to the center right side of the liner back piece and baste it, and the tag, in place.


Your pieces are ready. You can go back to the regular instructions of the Duke jacket or continue for other options. (links to other options? Anchors?)
Hood (with functional cords):
-
When you reach the Collar section of the regular instructions, stop and follow here first.
-
Interface the patches that will go under your grommets.

-
If you’re using Heat’n’bond like me, determine where you want your grommets and press the patches in place.
Mines are 3/4" from the opening edge and 1” from the bottom edge. 
-
Topstitch the patches in place.

-
Cut a small cross in the middle of the patches. Insert the grommets and install as per the product’s instructions.

-
Assemble the hood as usual (see hood pattern instructions).
-
Topstitch around the opening.
-
Create a cord casing by topstitching again about 1” from the opening edge. The grommets must be BETWEEN the two lines of topstitching.

-
Find the center of the main back piece. Align it with the hood seam, clip/pin it in place, right sides together.
-
Continue clipping the hood to the main. One side should arrive 1/4" from the edge, on the Under Front piece.

Since the other side is the Wrap Over piece, you will finish clipping some inches away from its edge. 
-
Baste the hood in place.

-
Place the collar on the jacket liner, WRONG sides together (i.e. liners together). Starting 1/4" from the edge and finishing 1/4" short from the other edge of the neckline. Clip/pin in place and baste.

Note: I chose to keep the collar too, which implies a rather bulky seam. If you prefer, you can lose the collar.
You can go back to the regular instructions of the Duke jacket (where you join main and lining). Once your jacket is all sewn up, insert the cords in the casing.
You’re done! Good job!
(Written by Isabelle Couture, this blog contains affiliate links)