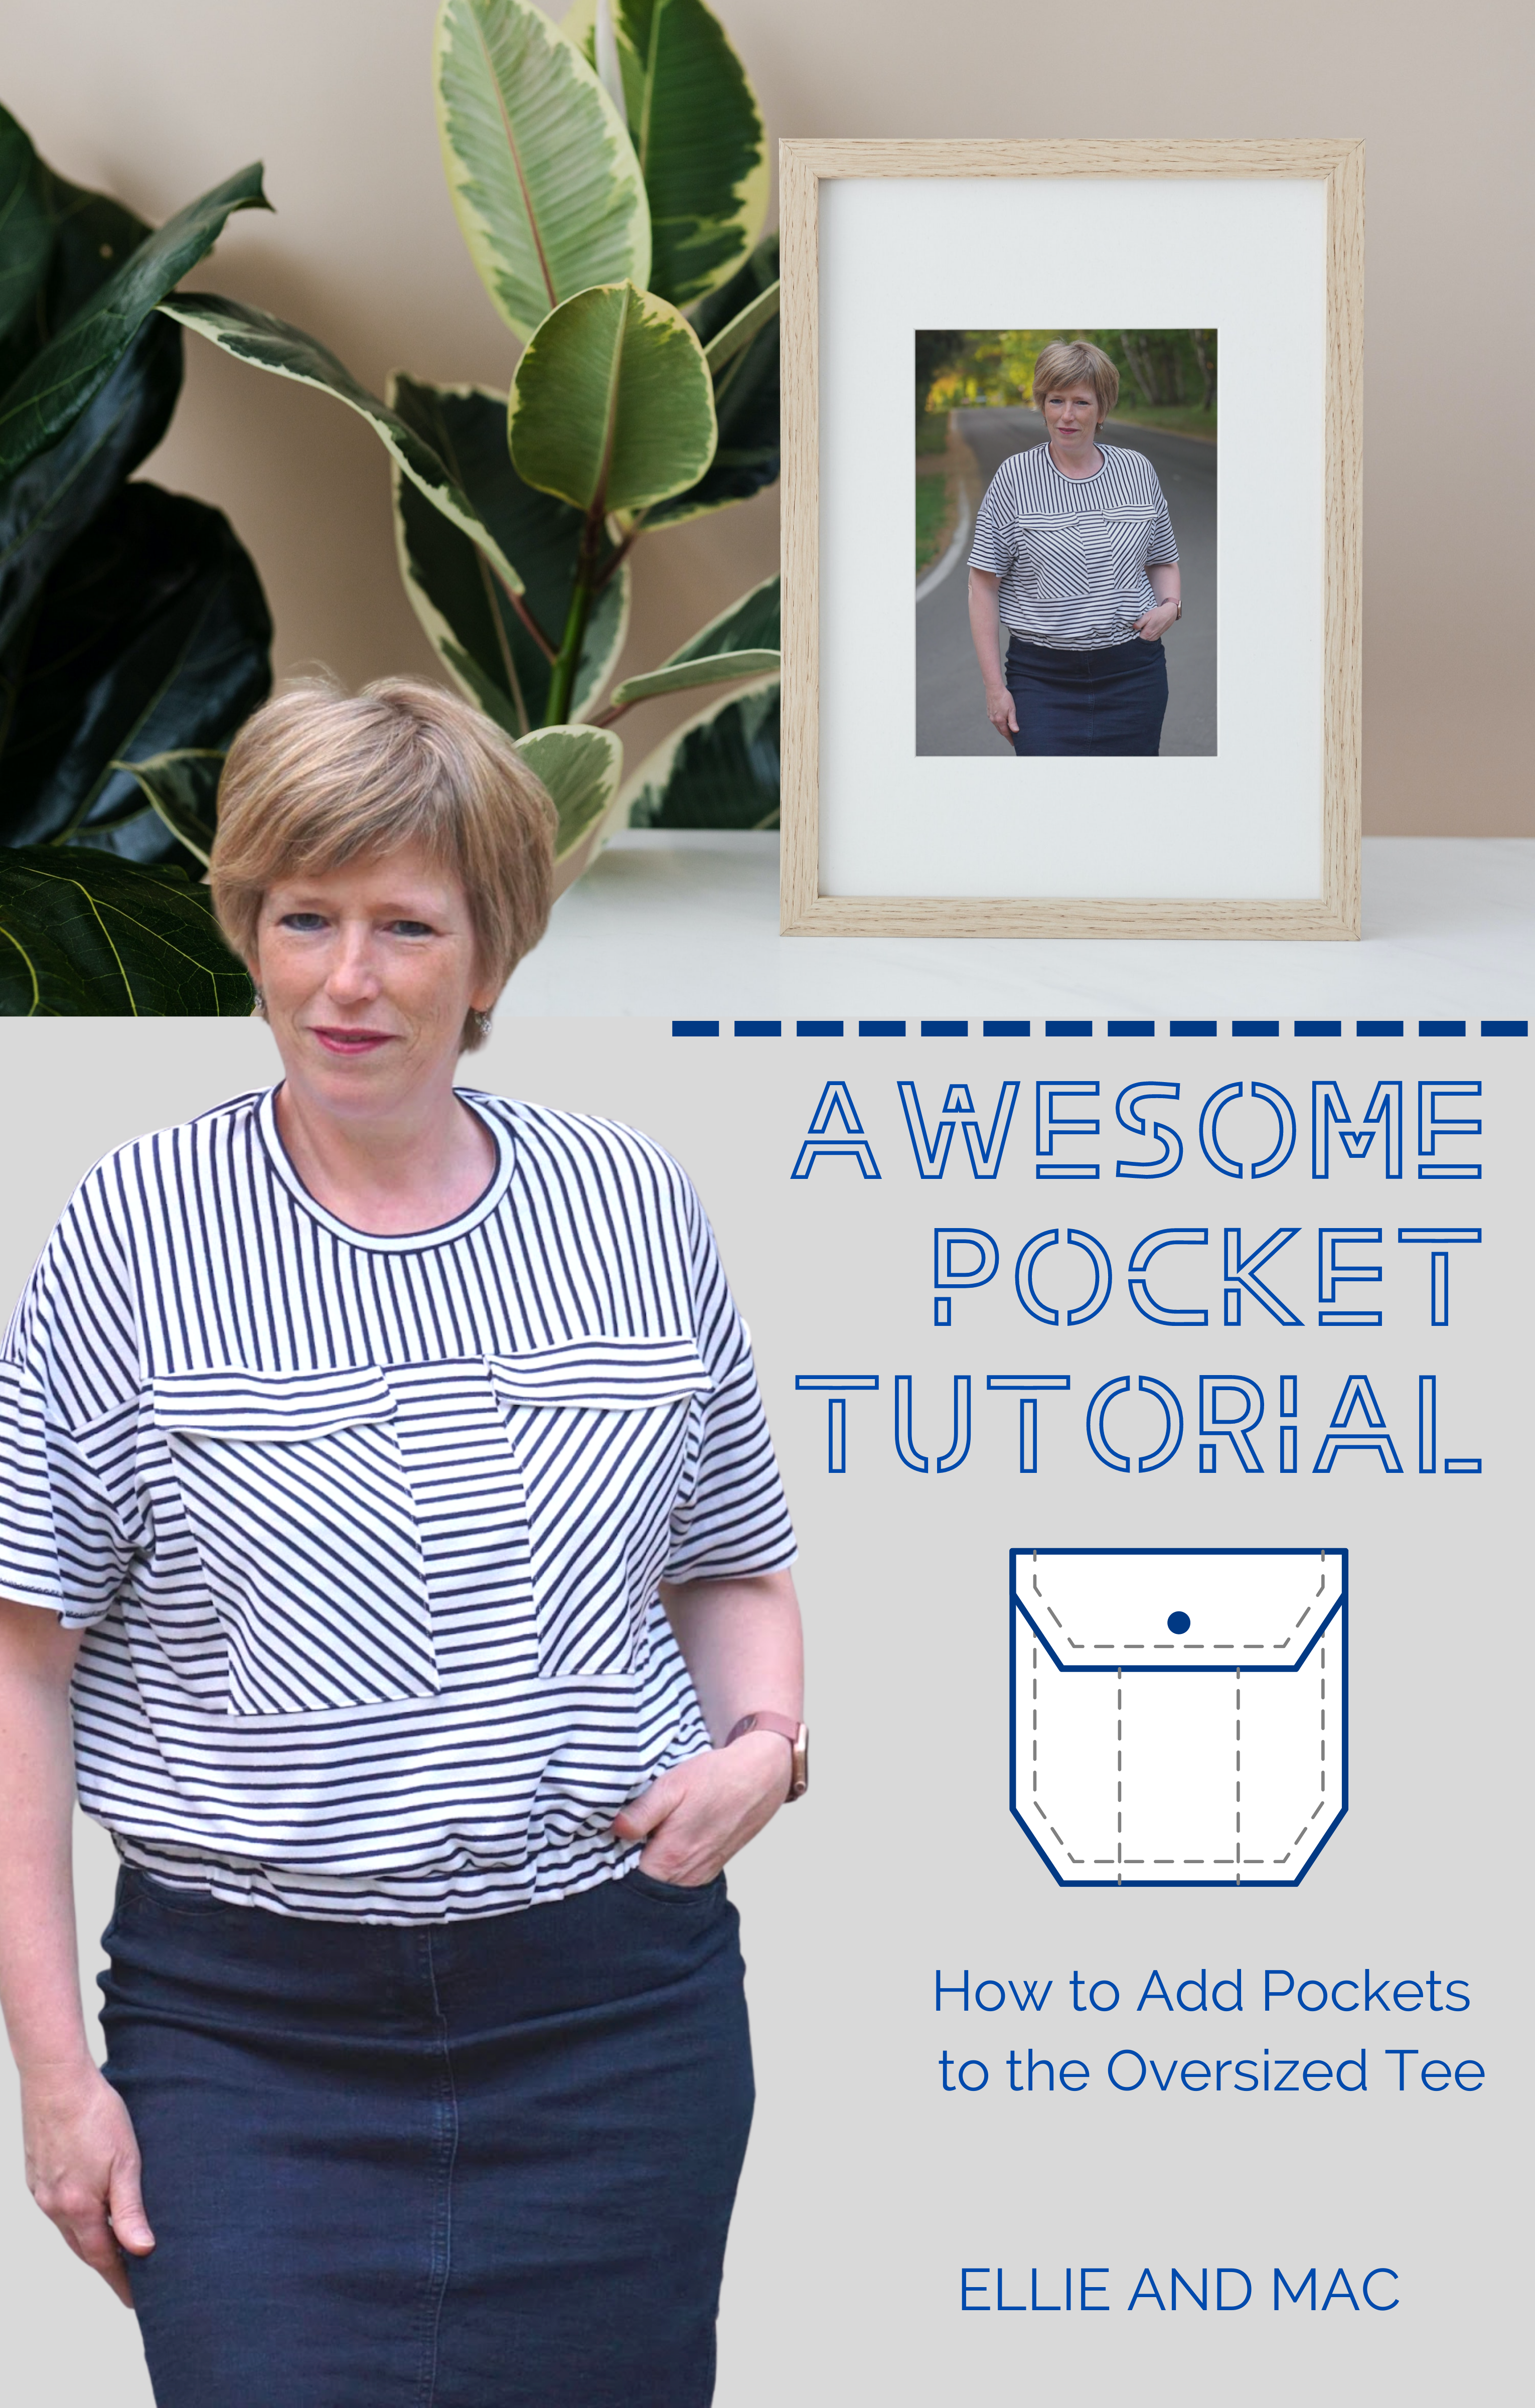
Hi! I'm Jessica, a guest blogger on the Ellie and Mac blog today. You can usually find me over at my own blog on my website, Let's Go Hobby. I'm excited to write today about a fun pattern hack using a free pattern from Ellie and Mac Patterns!
Do you Garden?
Do you garden or know someone who does?
I love to garden and I'm always needing this tool or that tool while out in my garden. Sometimes I'll remember to put the right tools in my gardening apron, but not all of them fit! Especially when I need my fold up saw and pruners in late Winter or my seeds, trowel, and hand rake in the Spring!
So, what's the solution to having all my tools and seeds on hand? A gardening tote bag with lots of pockets. And why not make it beautiful?
I used a the FREE Tote Pattern from Ellie and Mac to make this beautiful gardening tote!

If you've never sewn a bag before, you might think this could be difficult to make, but it's actually an easy pattern to make, it just takes some extra time if you want lots of pockets!
Want to learn how to make a gardening tote? Read on!
Ellie and Mac Tote Pattern
If you aren't familiar with the Ellie and Mac Tote to Go Pattern, it is a free tote pattern with lots of options!
I made the full size tote for a school fundraiser recently. I'll pop in a few pictures below so you can see what it looked like.

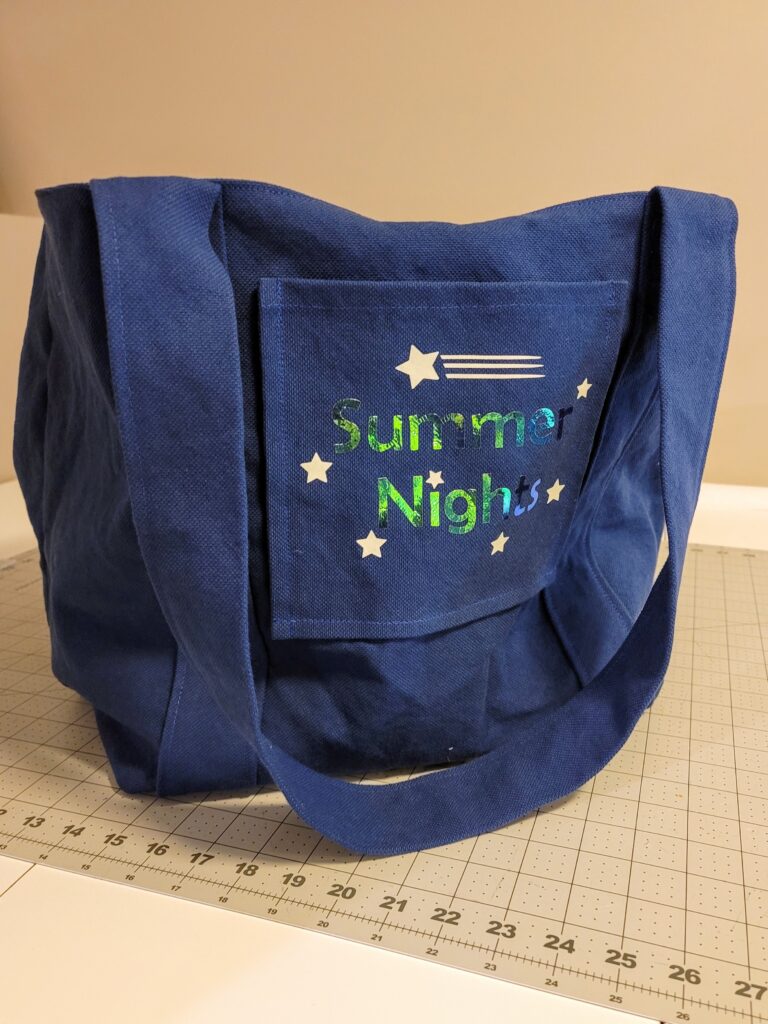
I added the small pocket to the front of this one and a big pocket to the inside. I used the tie straps option, although there's also an option for a magnetic closure with instructions in the pattern.
This tote is fairly large. (Check out the pictures on the website HERE to see how large it is).
If you would like a large gardening tote, you can keep the pattern at 100% scale. If you would prefer a slightly smaller bag, you can size it down before printing or projecting the sewing pattern.
How to Size the Gardening Tote
For my bag, I used my projector, but the same scale applies if you are printing it. I scaled this pdf pattern down to 87% of it's normal 100% size.
To Scale Down the Pattern on a Printer -
You'll want to select custom scale in the area that says something like, "Page Sizing & Handling." Then, where it says '100', type '87' instead.
See picture below for guidance.

To scale down a pattern on your projector -
You will start with the zoom percentage you normally use, and take the percentage from that zoom percentage number.
For example, my projector is calibrated at 30.2%. So I typed in Google, '87% of 30.2' and got 26.3% as my zoom for this bag.
The nice thing about using a projector, is that you can type your new zoom number into Adobe (or whatever program you're using) and see how big the bag will really be (minus seam allowances of course).
The Size of the Bag
Below you can see the size of the bag I made.

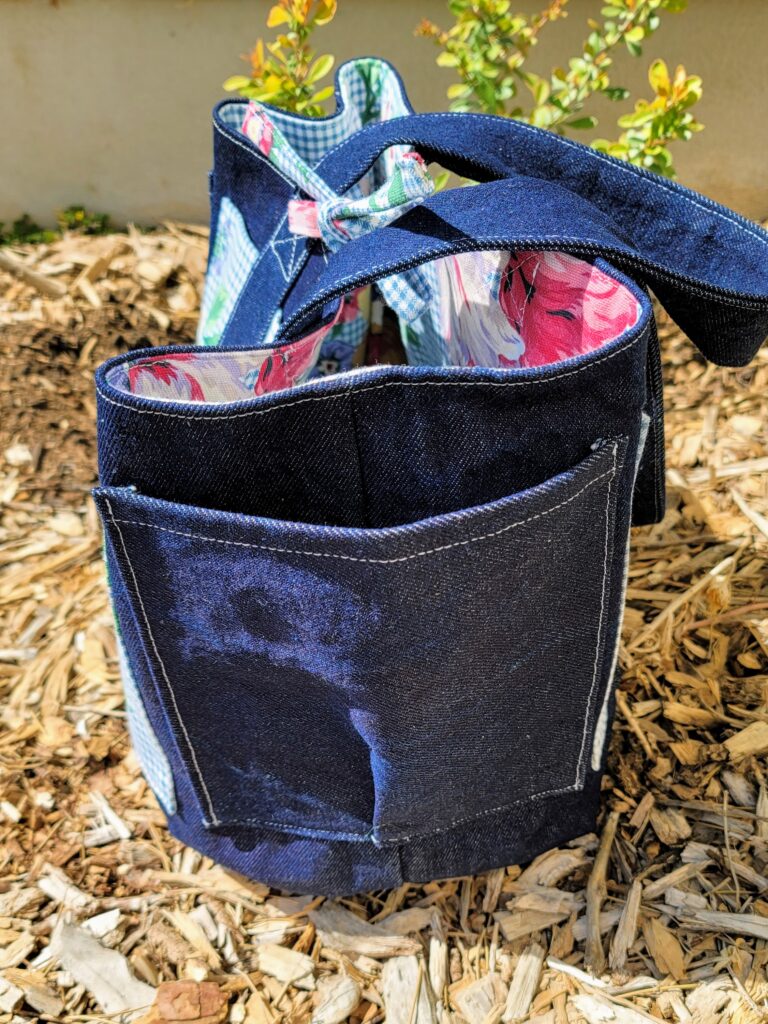
If you can see the hand rake, I do have to say that it's fairly long handled, I will be putting that one inside of the bag in the future. The side pocket at the right of the bag in the picture is holding my pruners and they stick out just a bit.
I think if I remade this bag, I would elongate the pockets for this reason, but it's still very usable.
That's something you could do though, since you haven't made one yet! Lucky you!
Pocket Planning
You can really do any pockets you want in any size and shape! I used the large pocket piece for the middle front and back as you can see in the picture below.

The straps are placed over the top in this case effectively splitting the large pocket into 3 small pockets.

I then added 2 narrower pockets the same length on each side. Those side pockets are not included in the pattern, so I'll show you how to sew the pockets on each side!
How to Sew the Pockets
The pocket instructions are detailed in the pattern, but you want to sew your pockets on centered and straight.
Here's a few tips to ensure that happens:
After finishing the edges, pressing in the pocket sides, and stitching down the top of each pocket as indicated in the pdf pattern instructions; Mark the center of the bag and the center of the pocket by folding the ends together to meet and then marking the middle part with a pin or clip as seen below.

Next Center the pocket up with both center points (on the pocket and bag piece) aligned. Be sure to measure from the top of the bag to the pocket all along the pocket. I have my pockets placed 2" from the top of the bag.

Side Pocket Details
For the side pockets, I cut them at the length of the large pocket, but the width of where the small pocket piece ends on the right side. See picture below - the ruler placement is where to cut.

Align the side pockets on one of the main bag pieces with the center of the pocket at the edge of each side as shown below.

Your final placement could look like this below. But feel free to do this your own way. If you'd prefer to have a large pocket in front, you could use the smaller bag piece and place the tote straps further apart.
You can also add a zipper to the smaller bag size in the center (the zippered pocket is included in the pdf pattern instructions).

Sewing the Side Pockets
You can sew all the way around the sides and bottoms of the center pocket as stated in the Tote to Go Pattern Instructions.
HOWEVER - IMPORTANT - You cannot sew all the way around the side pockets as they connect to each side of the back between a seam.
So, you will sew the inner side of each pocket vertically and then stop. Do not turn and sew the bottom of the side pockets yet.
First you will attach the straps, then after sewing the side seams, you can finish the side pockets.
How to Sew the Straps
If your fabric is extra thick like mine, you might not be able to sew it right sides together and turn as per the pattern instructions. If that's the case, here's a work around.
Grab your iron and lay your long fabric strap right side down. Now fold both sides in 1/4 inch and press with lots of steam. See picture below for reference.

Next, fold the strap wrong sides together matching the long edges up and press again.

Next sew down the entire length of the strap 1/8 inch from the open edge. Repeat for other strap.
Next sew the straps to each side of the bag as per pattern instructions.
Do remember that the straps can't be too close to the bottom edges since those need to be sewn together later, so you can play with placement, but be careful of the side seam allowances.
To check the strap alignment, you can place one bag piece on top of the other to ensure they line up.

Next sew down each side of the straps as per the pattern instructions.
Finishing the Side Pockets
After sewing the straps down on both sides, the pattern instructions have you sew the side seams. Since we have the side pockets, be sure they are flipped inside out of the way before sewing up the side seam.

After you've sewn one side seam, you can fold out the two side of the bag...

And place the pocket over top.

My pocket extended farther on the right side than the left in the picture above. To fix this I added one pleat at the center of each side pocket and then just sewed over it, backstitching at the pleat once to ensure it stays put.

On the opposite side, after sewing the side seam, you'll need to flip the bag right sides out and maneuver the bag into your machine to sew the bottom and sides up. Definitely doable still!
A Few Quick Notes
Self Tie Strap Adjustment
A quick tip if you choose the self tie strap. We made the bag smaller than it's original size, plus I felt the straps with thick fabric were a bit short on the last bag I made. So, I added about 3 inches to the length of each strap to ensure I could tie I nice bow to keep the bag closed.

You can see the self tie in the picture below.
I didn't add any pockets inside the bag, just because I didn't think I'd use them, but you totally could, just use the pattern instructions for placement.
Just complete your Gardening Tote per the instructions in the pdf pattern file now!
Where to Find the Free Pattern!
Want the free tote pattern download? Click HERE!

I hope you enjoyed this tutorial and all the of the steps made sense! If you have any questions, feel free to reach out to me on social media or via email.
Instagram - www.instagram.com/sewletsgohobby
Facebook - www.facebook.com/letsgohobby
Email - letsgohobby@letsgohobby.com
You can find all of my previous Ellie and Mac Posts on the blog by clicking HERE.
You can see all of my Let's Go Hobby Blog posts by clicking HERE to get to my main website page.
Happy Sewing!
This post includes affiliate links to the bag, the bag is still free!
(Written by: Jessica Luckert)