Hey Ellie and Mac fans! Jessica here from the blog Let's Go Hobby, where I blog about sewing, gardening, food, and more.
I'm back again for another pattern hack installment! You can check out my last hack on the EM blog when I made the Sunset Dreams Dress into a fancy tank top HERE.
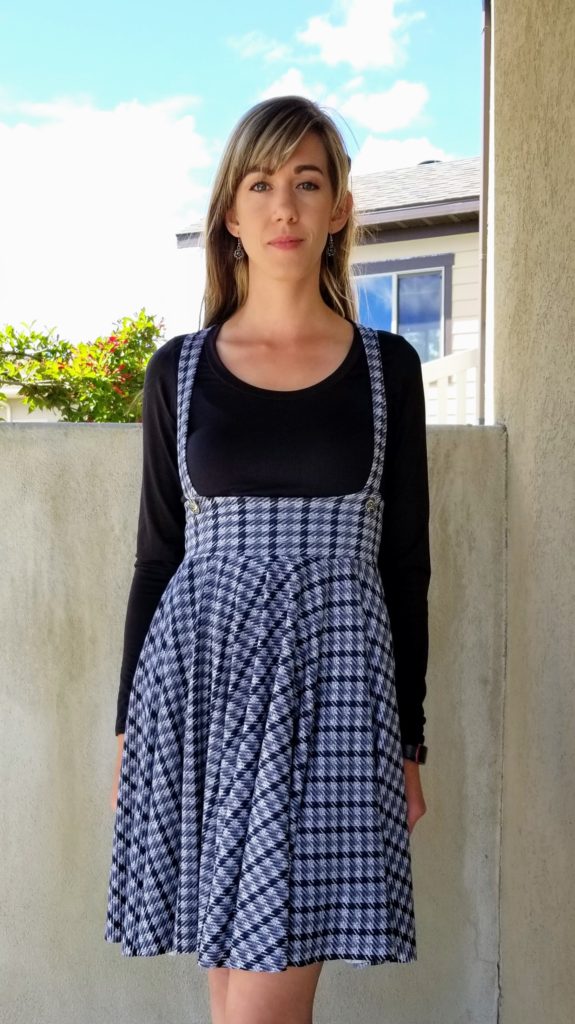
Today, I will share with you a much simpler pattern alteration on the super cute Be Smart Jumper sewing pattern.
Inspiration
I've liked the Be Smart Jumper for a long time but just hadn't gotten around to making it yet. It really is an absolutely adorable skirt pattern to begin with, and truly looks great with no changes.
But, as patterns are just guidelines, it can be fun to mix them up and add a bit of spice right?!
For inspiration, I googled, "unique jumper skirts with straps." What do you know, I found some really cute inspo pics, including one with a little scoop out of the front waistband in between the straps. Plus a few buttons!
Mine is not a huge scoop, but I quite like it! And the buttons are just for eye candy.

Implementation
Luckily, Lindsey (Ellie and Mac's Designer) did all the heavy lifting on this pattern, so all I needed to do was figure out a way to add that fun little curve at the top of the waist band.
You could probably do this to the low waist version too, but I really like the look of the high waist version of this pattern.
Fabric
I used a really fun hounds tooth DBP from I've been holding on to for a while in my stash. I was just waiting for the right project to come along to use it. Here it was!
DBP (double brushed polyester) wouldn't work on it's own for the waistband of a regular circle skirt, but with the straps, the jumper stays right where you put it.
The Changes
I cut out the circle skirt for the high waist version first, as that part doesn't change in this hack. I also sewed up the straps per the pattern instructions, so that they were ready to sew in later.
Waistband Back
Next, I cut out the back of the waistband. Now, the original pattern has you cut 1 waistband on the fold, but since the front and back band will now be different, we need to cut these out separately.

You will need to add additional width to this pattern piece for the seam allowance. To do this, you will measure out 1/4 inch on one of the shorter sides of the rectangle and make your end cut there. In the picture above, I laid my ruler down a 1/4" below the pattern piece and cut across that line.
Waistband Front
The front is where things are a bit more involved, but it's not difficult!
You will need to add a seam allowance to the front of the band as well, but since we are cutting out a scoop, it's a bit more complicated.
I folded my waistband pattern piece in almost half (hamburger style), but left one edge 1/4" off from the the other as seen below. Alternatively, you could add that 1/4" to the pattern piece by tracing a new piece or by adding a strip of paper a 1/4" wide and the same length.
Either way, you will need to fold the waistband in half hamburger style in order to cut out the front curve.

Drawing the Curve
In order to figure out where to draw your curve, you will need to measure over from the side of the pattern piece to find out where your strap placement is as you don't want the straps to be inside the dip.
The pattern instructions have you measure over 4" from the edge, but I wanted the curve to be wider, so I measured over 3", placed the strap on top and saw that I would need to start my curve at 3 5/8" from the sides.

To draw the curve, I used a french curve ruler, however, the french curve is not necessary. What you are looking for is a gentle curve from the start point (at 3 5/8" from the side) over to the fold in the paper. Near fold, I wanted the line to straighten out and become almost parallel with the top of the pattern piece.
You can see the curve I drew below.

If you want a more dramatic curve, you can certainly draw this deeper, just be aware that if it's extremely deep, you may need some clear elastic or interfacing to stabilize the top edge.
After you have your curve drawn, you can simply cut along the drawn curve with the paper still folded, then unfold the pattern piece to reveal your new curve!

Add 1/2" to the side of this pattern piece (the side opposite the curve needs extra seam allowance as we will be sewing the top around the curve). Then cut your front waistband fabric out.

Next cut the piece you just cut in half, by folding the fabric up to align the two curves, then cutting along the fold line. See picture above for clarity.
That's it for alterations! Now you just need to sew it up.
Sewing the Hack
Step 1
Align the two carved out curves on the front waistband pieces right sides together. With right sides together, sew all the way along the top front waist band through the curve and along the flat parts.

Step 2
Unfold sewn front waistband piece and, with right sides together, sew short sides of the front and back waistband pieces to create a loop.
From here, you can follow the instructions in the pattern to complete attaching the waistband to the skirt.
Step 3
Remember that when you attach the straps in front, you will place them an inch wider than the pattern recommends, basically you want the straps to be right where the curve ends at the flattened out parts.

Step 4
Buttons! These are purely for decoration, but they add such a nice touch. I attached them just below where the straps are attached to the front of the waistband. It almost looks like the straps button on right?
If you need help with how to sew on a button, you can check out my step by step tutorial HERE. You won't need to make a button hole or make a shank since this is a button just for show!
That's It!
That's the end of this hack tutorial! Now you get to wear your super cute jumper.

By the way, how cute is the back of this jumper with the criss cross straps? I love that detail.

I chose not to hem the skirt. It really didn't need it! Did you notice?

Anyway, I hope the tutorial for the Be Smart Jumper all made sense, but if you need any help, feel free to reach out!
You can find me on instagram @ www.instagram.com/sewletsgohobby
or on Facebook @ www.facebook.com/letsgohobby
or on my blog @ www.letsgohobby.com.
If you are interested in seeing other Ellie and Mac patterns I've made, you can check out those makes on my blog HERE.