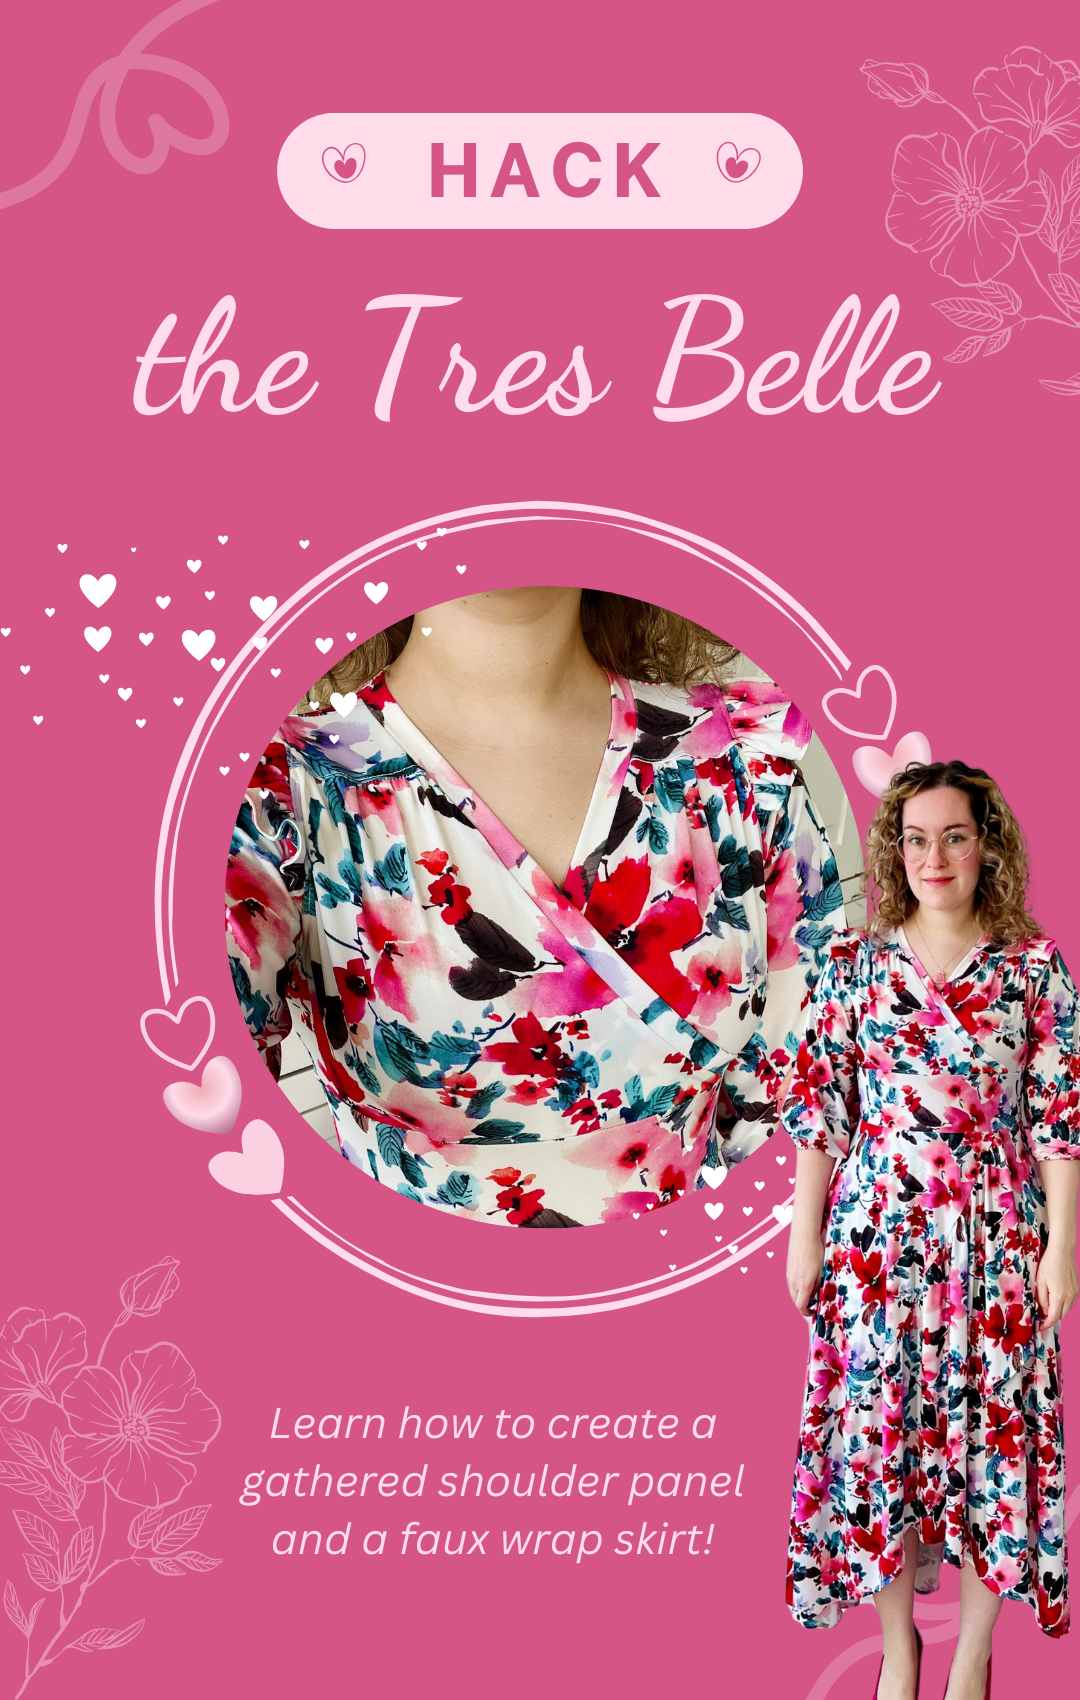
Hi all, it’s me, Amy, here today with a tutorial on how to transform your Tres Belle dresses by adding gathered shoulder panels (and a little optional shoulder ruffle), and how to slash and spread your sleeves to create a flared ¾ sleeve with an elasticated or cuffed hem. I am also going to show you how to alter the Lakeisha flared skirt to create a faux wrap skirt, which nicely mirrors the faux wrap effect of the Tres Belle bodice!

Please note, I have used the waistband hack on the dress I have made for this tutorial that I showed how to create here on this previous tutorial:
https://www.ellieandmac.com/blogs/blog/3-hacks-in-1-with-the-tres-belle-dress
If you would like to add a waistband to your dress, follow the instructions in my tutorial to alter your paper pattern to include a waistband BEFORE you carry out the alterations featured in this blog.
Fabrics I have used in this project:
- Floral ITY from the group ‘Rena’s Fabrics Galore’ on Facebook
THINGS YOU WILL NEED:
-
Pencil/pen
-
Ruler
-
Paper
-
Scissors/rotary cutter
-
Ellie and Mac patterns – Tres Belle, Lakeisha
-
Pins or clips
Optional but useful:
-
Pattern weights
-
scotch/washi tape
-
Pencil eraser/rubber
If you don’t yet have the pattern(s) needed for this tutorial, you can find them here (afflinks):
Tres Belle:
Lakeisha:
Please note I use a projector rather than paper patterns so all my pattern alterations take place digitally, but you can follow my instructions just the same using paper.
Ok, on to the instructions!
GATHERED SHOULDER HACK
Firstly, you will need your Tres Belle front bodice pattern piece in front of you. It should look like this (if you have made alterations to your pattern following the waistband tutorial, your bodice piece will look a little different – that’s fine, just put your waistband to one side and follow my instructions using the bodice piece you have):

Make a copy of the pattern piece by drawing round it on a new piece of paper and cutting it out, so that the alterations you make do not affect the original pattern piece.
You need to measure down from the shoulder by 3” – you can increase or decrease this measurement according to where you would like the gathers to sit, but this is the measurement I used – and draw a line across your bodice shoulder, like this:

Cut along this line you have drawn, so your front bodice is now in two pieces, we will refer to them as the shoulder piece and the lower bodice piece.

Next you need to add 0.25” seam allowance to both pieces along the edge you just cut.

At this point, measure the width of top edge of the lower bodice piece, where you just added your
seam allowance. Mine measures a little over 3”. Make a note of this number as you will need it later.
Put the shoulder pattern piece to one side as this piece is finished.
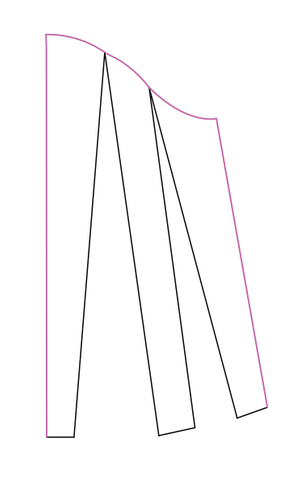
Take your lower bodice piece and draw three lines from the top edge (where you added your new seam allowance) to the waist, spread out approximately evenly across the new seam allowance line. It should look something like the picture below – it doesn’t have to look exactly the same or perfectly even, just something like this. Cut along the three lines you have drawn but leave a tiny bit of paper still attached at the waist end of the line so the pieces you have cut are all hinged together and you can spread them apart.

Refer back to the measurement you took earlier – you want to spread your hinged pattern pieces apart so that they measure approximately twice the earlier measurement you noted down.
You can spread them more or less if you want a different amount of gathers. As you spread the hinged pattern piece, make sure you have a fresh piece of paper underneath so that when you have your piece spread as you like it, you can stick it down to the fresh paper and draw round it, smoothing out the lines top and bottom where it has been spread, as you go.

Now you can cut out the finished lower bodice piece.

Your final shoulder piece and lower bodice piece should look like this:

That’s all the pattern alterations complete!
Moving on to construction, cut out two mirrored shoulder pieces and two mirrored lower bodice piece.
Gather the top of the lower bodice piece using your preferred method (for example two rows of basting stitches), so that it is the same width as the bottom of your shoulder piece.

Pin right sides together.

Baste the two pieces together with a long straight stitch so that they are held together in place and don’t slide around, and then serge the seam or use a stretch stitch on your sewing machine to finish. You can now remove your basting stitches.
Press the seam up and topstitch if you wish. I have used a triple stitch to topstitch as it looks like a straight stitch but still have some stretch.

Now your front bodice piece is complete, and you can follow the Tres Belle instructions to carry on and finish your bodice construction, treating your front bodice as though you had cut it straight from the original pattern. If you are adding a waistband, you can go back to the tutorial I linked at the start of this blog, and use my instructions there to finished constructing your bodice with a waistband.
This is what it will look like when the shoulders and waistband are attached.


SHOULDER RUFFLE HACK
First you need to measure the armscye of the back and front bodice pieces that you have joined at the shoulder. Take ½” off that number which represents the seam allowance at the underarm. My measurement at this point is a little over 16.5”
I want my shoulder ruffle to go about 2/3” around the armscye, so I multiply my armscye measurement by 0.66 which equals about 11”. I will double this length to create a good amount of ruffle length, so I will cut my ruffle about 22” long.
To create the pattern piece, draw a line half the length of the total ruffle length (11”), and then draw another line below the first however wide you would like your ruffle to be (I did mine 3”, taking into account ¼” seam allowance to attach to the bodice, and I will also line my ruffles using a ¼” seam allowance, so my ruffle will end up 2.5”).

Draw a vertical line to connect the two horizontal lines at one end, and draw a curved line using a french curve ruler to connect the horizontal lines at the other end.

You can use this piece to cut your ruffle on the fold, and your cut out ruffle will look something like this:

You can choose to hem or line your ruffle or leave it raw.
Construction – if you are going to hem (cut 2 ruffle pattern pieces) or line (cut 4 ruffle pattern pieces) your ruffle, do that first.
I have lined mine, so it now looks like this:

Fold it in half and cut a centre notch. Then, gather the straight edges down until the ruffle is about 11” long. and position it right sides together on top of the bodice around the armscye, matching the centre notch to the shoulder seam. There should be about 3” of armscye left either side of the ruffle. Pin it together well and baste in place.


You can now go ahead and add your sleeves.
¾ ELASTICATED OR CUFFED SLEEVE HACK
You will need the Tres Belle sleeve piece, create a copy of it and cut it out at the ¾ sleeve line:

Draw some straight lines between the top and bottom of the pattern, I only did 2 but you can do as many as you like. Cut through these lines leaving a small bit attached at the top to act as a hinge. You want to spread the pieces out adding a total of about 6” between all the pattern pieces (you can add more or less depending on how flared you would like your sleeve to be).
Stick your spread out pattern pieces down over a fresh piece of paper and draw round it, smoothing out the lines where you spread your pieces apart.

I made my sleeves using this pattern piece, however once it was made I could see that it would benefit from adding an extra inch of length along the fold line so I would recommend the following:
Extend your fold line (along the left hand edge of the pattern piece) down an extra inch, and then taper that back to the original line at the lower right corner of the pattern piece.
It should look like this:

That’s your sleeve pattern finished! You can now attach your sleeve head to your bodice according to the Tres Belle pattern instructions, or your preferred method. Do not close the side seams yet.


To finish the wrist end of your sleeve you have two options – elasticated or cuffed.
If you would like to do the elasticated method:
Turn the raw end of your sleeve up (wrong sides together) by 3/8” or ½” and press in a memory crease.

Turn the memory crease back down again and sew the sides of the bodice and sleeves closed.

Fold the memory crease back up again, and topstitch close to the raw edge of the memory crease using a straight stitch on your sewing machine (as the sleeve won’t be stretched in this area a stretch stitch is not required), leaving an opening of about 1-2” to insert your elastic.

At this point it would be worth trying on your bodice so you can loosely measure the circumference of your arms at the point where the sleeves come to. Cut some ¼” or 3/8” elastic to the circumference of your arm that you just measured and add some extra length to the elastic to account for wearing ease and needing to overlap the elastic for it to be joined together. I found that I needed to add 3” to the circumference of my arm for comfort, but this may vary depending on how stretchy your elastic is.
Using a safety pin or bodkin, insert your elastic into the channel in your sleeve that you just created, making sure that you pin one end of the elastic in place so it doesn’t get lost inside the sleeve.

Making sure the elastic is not twisted inside the sleeve channel, overlap the elastic by about 1” and sew the ends of the elastic together with a zig-zag stitch.


Topstitch the opening in your sleeve channel down so that the elastic is fully encased.
Repeat with your other sleeve and your elasticated sleeves are finished!
If you would like to add a cuff instead, measure your arm circumference as described for the elasticated sleeve method, add seam allowance (two lots of ¼”, so ½” total), and you can add some wearing ease depending on how tight you want the cuff to be and how stretchy your fabric is. Draw a rectangle with this measurement as your longest side. The shortest side will be determined by how wide you want your cuff to be. Say you want your finished cuff to be 1”. The shortest side of your rectangle will be twice the width you want your finished cuff to be plus two lots of seam allowance. So, 2” + ¼” + ¼” = 2.5” total size. You will need to cut two of these cuff pieces, one for each sleeve.
Fold one of the cuff pieces in half wrong sides together along the longest edge and press. Open the pattern piece back up and fold it right sides together along the shortest edge and sew the two short edges together. Turn right side out and fold the piece back along the line you pressed in. That is your cuff finished.
Sew two rows of basting stitches around the raw edge of your main sleeve at the cuff end, or use your preferred gathering method, and gather it down so that it fits the cuff you have made. Fold your cuff back over the gathered sleeve, right sides together, and pin or clip the pieces together. Attach using a stretch stitch. Remove your basting stitches. Repeat for the other sleeve.
Your cuffed sleeves are finished!
The finished bodice should now look like this (shown here with elasticated sleeves):

Please note, if you added the ruffle at the shoulder, I would recommend topstitching around the armscye with a stretch stitch now the sleeve is attached – this is optional but will help your ruffle lay more nicely. Also make sure you press it well.
You can stop here if you wish, and add your preferred skirt, or continue reading if you would like to draft your own faux wrap skirt.
CREATING THE FAUX WRAP SKIRT
Now, Ellie and Mac already has a wrap skirt pattern, and if you like, you can use this pattern instead of drafting your own. The reason I am going to show you how to draft one based on the flared Lakeisha skirt, is that the existing wrap skirt pattern is fairly close fitting around the hips, and my preferred fit is something looser, at the least a half circle skirt type fit, which is what the Lakeisha flared skirt pattern is.
If you are happy with a closer fit on the hips, go ahead and use the existing wrap skirt pattern instead. You will need to alter the pattern pieces a little at the waist to make sure that the size matches the size of the bottom edge of your bodice, and then you can skip my drafting info and move on to my tips on construction below!
HOW TO ALTER THE LAKEISHA FLARED SKIRT
The first thing you want to do, is to decide how long you want your dress to be once the ruffles are added. Please note I am only 5’2” so my measurements are based on how they fit on my height – you will need to adjust these measurements based on your height.
So, I want this dress to be ankle length on me at the longest point. I know that based on where my waistline is, I have about 37” of length from there to my ankle. I am going to do a ruffle that is 13” wide around the bottom of my skirt, and so I will make the longest part of my skirt about 23” long (working on the assumption that the weight of the fabric will pull it down a bit more as well). Now is the time for you to decide what measurements you want to use for the length of your skirt and ruffle. If you use these measurements and are taller than me than you will probably end up with a midi dress instead.
You will now need the front and back Lakeisha flared skirt pieces.
First, take your back skirt piece and lay it over a new piece of paper. Draw round it leaving plenty of space below it to create a copy. If your paper is not big enough, use the existing pattern piece and only add paper along the bottom edge of the pattern, you can attach it with washi/scotch tape so that it is easy to remove later if you want to use the original pattern piece again.

Extend the straight lines so they are the length you want your skirt to be (23” for me)

Redraw the hem line of your skirt (a french curve ruler may be useful here), making sure that it is even all the way round.

Next you will need your front skirt pattern piece.
Using the technique described above, increase the length of your skirt as we did for the back skirt piece. You will need to make two copies of this so that you can keep the original untouched.

Take one of your copies. Mark the centre line at the waist from the original pattern piece. Measure from the centre point to the right hand edge and make a mark halfway between these two points – this is the quarter point of the front waistline, and this is where the top of the faux wrap skirt piece is going to finish to approximately match the position of the faux wrap on the bodice when using the waistband hack.
You want to draw a curved line between the bottom left skirt edge to the quarter point you just marked, it should look something like this:

A french curve ruler will be helpful for this. Cut it out and this is the finished pattern piece for the uppermost part of your front wrap skirt.
If you are not using the waistband hack, you can ignore everything to do with the quarter point and draw your curved line up to the top right corner of the front skirt pattern piece if you want to more closely match the faux wrap position of the original Tres Belle bodice, which goes right over to the side seam.

Don’t worry if this looks like you have made quite a small piece compared to the original size of the skirt – remember you will be adding a 13” ruffle (or your preferred size) to this piece so it will end up bigger than it looks now.
Next take the second copy of the front skirt piece that you made earlier. Align the new smaller curved skirt piece that you have just made to it’s left hand edge and draw round it. Now turn your smaller curved skirt piece back to front so it is mirrored, align that with the right hand side of your skirt and draw around that.

You will need the length of your unaltered skirt piece – for me 23”. Work out what a third of this length is, and measure up from the bottom left hand corner of the skirt piece and place a mark at this measurement. Draw a curved line from this point to the bottom right hand corner of the skirt piece.
It should look something like this:

If you wish you can draw your curved line so that it hits higher than a third up from the bottom of the skirt – the reason I have drawn it here is two fold – one, it means that the crossover point of the two front skirt pieces is lower and therefore shows less leg, not particularly relevant for this dress as it is very long anyway, but may be relevant if you made it using only a narrow ruffle, and two, don’t forget that you are adding ruffles to both front skirt pieces. With the under front skirt piece in the position I have drawn it, the ruffles start lower down – if your under front skirt piece curves right up to the waistline, you will have ruffles much higher up wrapping underneath the top front skirt piece. This can sometimes look bulky and less flattering in my opinion, depending on the thickness of your fabric.
Cut out the pattern piece for the under front skirt piece, it should look something like this:

Next, measure the hemline of your back skirt piece and two front skirt pieces and note these measurements down separately. You need to decide how full you want your ruffles to be. Typically you might choose to multiply your hem lengths by 1.5 or 2 times and this would be the length of your ruffle. I am limited by how much fabric I have, so I have multiplied my hem lengths by 1.4.
Multiply each of the three hem lengths that you have measured by the ruffle fullness that you want (ie 1.5x), and note down these three new measurements. These are the lengths of the three individual ruffles that you need to cut for your three skirt pieces.
Now cut 13” (or your preferred size) strips of fabric to the three lengths you just worked out (you may need to join more than one strip together to get the desired length). Place each skirt piece with its corresponding ruffle so you don’t get confused which goes with which piece.
CONSTRUCTION
Gather each ruffle using your preferred method, until the length of the ruffle matches each skirt piece hem line. Placing right sides together, attach each skirt piece to its corresponding ruffle.


When you get to the uppermost front skirt piece, you should hem the short edge of the ruffle that will end up by the waistline before gathering and attaching it to the skirt (or you can choose to leave it raw).


Press the seams up on each skirt piece.
Now this is a little unusual but due to the way the skirt pieces are joined together, it is necessary to hem each individual skirt piece now before any skirt pieces are attached to each other. Or you can choose to leave them raw, but if you want them hemmed, do it now.
Next we will baste the two front front skirt pieces together. Take the larger under front skirt piece and cut a notch at the centre point of the waistline, and then a quarterpoint notch between the centre notch and the right hand edge of the skirt piece. This quarter point is where we will expect the smaller upper skirt piece to match to, excluding the ruffle (technically it will be a quarter of an inch closer to the centre notch as we have added the ruffle and therefore lost the seam allowance at this point, but close enough).
Place the larger under front skirt piece right sides up on a flat surface. Take the smaller uppermost front skirt piece, and position it, right sides up, over the under front skirt piece. Align the left hand edge and pin well along this edge, and then pin along the waist line, using the quarter point notch you cut in the under skirt as a guide to where the uppermost skirt piece should finish (excluding the ruffle). Pin well together along the waist line. Baste the two front skirt pieces along the waist and left hand side– note the edge of the ruffle attached to the larger under skirt piece will be basted to the uppermost skirt piece at the side seam, but the hemmed edge of the ruffle attached to the uppermost skirt piece will NOT be basted to the larger under front skirt piece at the waistline. When you baste the waistline, stop when you reach the ruffle.
This is how it will look when the two front pieces are pinned together – note that the smaller uppermost front skirt piece (which as it is right side down is the layer closest to the carpet in this picture) will be longer than the larger under front skirt piece (top layer in this picture as it is right sides down) – that is to be expected and you do not need to try and stretch one piece to make them both the same length, just passively pin them together wherever they match to.

Now your front skirt pieces are essentially one skirt piece. Place the front and back skirt pieces right sides together and sew the side seams using a serger or stretch stitch.
This is how it should look before you sew the side seams:

Note, this is effectively a sandwich – the bottom layer closest to the carpet, which is right sides up, is the back skirt. The next layer right sides down on top of the back skirt is the smaller uppermost front skirt piece (you can see the longer corner of it hanging down on the bottom right hand side). The top layer is the larger under front skirt piece, right sides down. You can see that the longest edge of each of the front skirt pieces matches the length of the back skirt piece.
Finally, matching the side seams together, position your bodice and skirt right sides together and sew the waistline together with a serger or stretch stitch.
Here is close up of the waist area so you can see how the faux wrap of the bodice mirrors that of the skirt nicely.

Press well and your dress is finished! Well done, that was a little complicated but you made it!


(Written by: Amy Day)