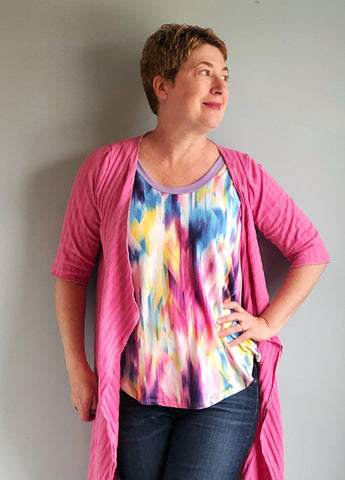
Hi everyone! Today I am sooooo excited to share an easy little hack for the Curved Hem Tank I call the reversible version. Not reversible, like, inside to outside, but reversible, like, front to back! You will have sewed up one version of the tank and your friends will think you have two lovely new tops. Read on to learn more!
I actually came up with this hack out of a mistake I made the first time I sewed up this pattern. I was so excited to get to my final product that I accidentally cut out two front pieces. Luckily I figured this out before I cut out my neck piece(because if I had cut the piece that came with the pattern, it would have been too short). This is because the front has a lower neckline than the back. I pivoted from my error, sewed up my shoulder seams, and then remeasured the neckline to cut a band the right size (oh yes, by the way, I do bands with this top instead of bindings, just personal preference). I really loved my finished top, and since the front and back are essentially the same, that got me thinking….what if I did a completely different fabric in front and back, and then I could wear it either way for two different looks? Thus, this hack was born. If you wear tanks under cardigans as I often do, you get two tops for the price/effort of one!
Here is the process I followed and the adjustments I made:
First (this is probably obvious) cut out TWO front pieces. Do NOT cut out the neck or arm hole pieces yet – you will need to wait until after you have sewn the shoulder seams to remeasure the neckline and then after you sew the side seams to remeasure the arm openings.

Next, sew the shoulder seams together per the pattern instructions.
We now need to remeasure our full neckline to determine our binding or band length. Since the front and back are exactly the same, you can measure from one shoulder seam to the mid-point of the front or back and multiply by four. Or you can measure the full opening to get the measurement. Multiple this final number by .85 to get the length of your band and cut out your new neck piece.
Now it is time to pin or clip your neck piece to the opening. Here is where the process will differ from the normal tank.
First, quarter your neck piece and neck opening…but since the front and back neckline are the same, you can actually just use the shoulder seams as quarter marks along with the front and back center of your top. That’s easier, huh??
Second, since you want to be able to wear this tank both ways, you want to clip the part of the neckpiece with the seam in it to one of the shoulder seams instead of aligning it to the back. This will make it significantly less visible when wearing the top.
Sew on your neckpiece per the pattern instructions.
Sew up the side seams per instructions. Now it’s time to remeasure your arm openings because those will differ slightly too. Follow the same process for the arm holes and cut out your two pieces for this, attaching per the pattern instructions.
Lastly, finish your hem with your preferred method, and you are done! You now have a reversible fun tank top!
I hope you enjoyed this hack!
Andrea @ happy.things.here
(Written by: Andrea Mulford)