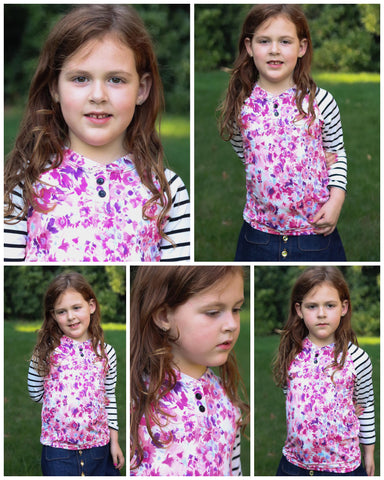
Hey there, Kendel here! Today I am going to show you a fun hack to add a button placket to your favorite Raglan tee. The Going Home sweater (both kids and adults) and the Straight Fit Raglan will work for this fun hack.
So lets get started you will need:
- Ellie and Mac raglan pattern of your choice
- Measuring tool
- Fabric marking pen (your favorite will do)
- Interfacing
- Wash away wonder tape (optional)
- Coordinating buttons
Step 1
First you will cut out all your pattern pieces. You will need a neckband option however you can pick any of the other options you want! Once all your pieces are cut out lay your Front Bodice piece in front of you on the table. Decide how tall you want your placket to be.
Kids sizes will be somewhere in the 2”-4” range, depending on preference.
Adult sizes will be in the 3” to 5” range, depending on preference.
Step 2
Once you have decided on placket length, you will cut a rectangle from your fabric and one from interfacing at: 6” wide by your decided length plus .5”.
Fuse the interfacing to your fabric per instructions on package. 
Using you measuring tool and fabric pen draw a line .5” from each side on the wrong side of fabric.
Then draw a line at every inch the remaining distance across. 
And .5” up from the bottom. Your placket piece should look like this:
Step 4 (optional)
Optional: you might choose to remove some bulk if using thicker fabrics by cutting out these rectangles here:
Using these lines as a guide, create a crease by folding the placket wrong sides together at each line and pressing. Find the center of your bodice neckline front and draw a line with a heat erase pen or other similar marking tool from neckline down, making sure you go past the length you have chosen for your placket.
Line up the center of your placket with the line you just created. Pin Clip or use your wonder tape to hold your placket in place.
Step 6
Sew around the center box on the placket making sure to turn the corners with the needle down for crisp corners. Cut down the center of this box stopping .5 inches from the bottom edge of the box. then carefully cut to each of the bottom corners paying careful attention to not cut stitches sewn in the previous step. Carefully cut the bottom rectangles apart.
Lay the front to that the neckline is facing you on the table. Fold one side of the front RST with the rest of the front so that you can work on the first side. Using tape or pins secure the outer .5' section WST with the placket at crease line. secure the bottom tab up WST, the center .5" WST and then fold the placket over and secure the center tab. you will then fold on the last crease line inclosing this side of the Placket. sew along the inside edge to secure. 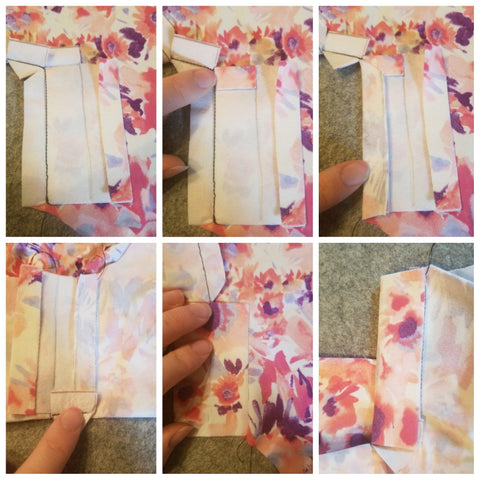
Repeat with the other side trapping the triangle in the bottom fold instead of the tab.
Step 8
If you are sewing function buttons sew your buttonholes now (you can use snaps or nonfunction buttons too) otherwise sew the bottom of the two plackets together in and X or a box.
Step 9
Assemble the rest of the pattern per instructions, except for the neckband.
For the neckband you will want to trim the short ends to a point (photo10) and attach each point to the edge of the placket and the center to the center back. I find it easiest to attach from the center back to the ends. Top stitch the seam down and away from the band. Add buttons and you are done!
Show it off we can't wait to see it!
(Written by: Kendel Walker)