![]()
Hi! It’s Sarah from @sewsaltyandfree!
Spring is right around the corner and although up here in Northwestern Wisconsin we’re still covered in multiple feet of snow and temps are still dipping into the negative digits, I’m preparing for warmer days to come!
One of my favorite patterns has always been The Forever Flounce Top. I have made it into a shift dress (shown in one of my previous blogs here). And I’ve made quite a few just as the pattern is instructed. This pattern never disappoints me and is always inspiring me!
My latest inspiration was a top I saw a friend of mine wearing recently. It looked very similar to the Forever Flounce, but it had TWO flounces! It was beautiful! I instantly thought it would look amazing as a dress as well!

I am a HUGE fan of matching outfits (and thankfully, my 9 year old still is as well)! With Spring fast approaching I knew this dress I envisioned in my head would make the perfect Mini and Me dress set for any get together we’d attend this Spring!
To make this vision come to life we’ll need both the Kid and Adult Forever Flounce Pattern as well as a skirt pattern for both kid and adult. For the skirt, there are quite a few options to choose from. My daughter and I looked through patterns together and thought about using skirts the Be Dreamy Dress, as well as The Kids’ Be Amazing Top/Dress and the Kid’s and Adult Be Confident Top/Dress and The Adult Trendsetter Skirt. We also thought long and hard about adding The Jersey Skirt which also comes in Kid’s and Adult sizes to make this dress! But ultimately we decided to use The Be Confident for my daughter’s skirt and even though it comes in adult as well, we decided to use The Trendsetter Skirt for mine.
The first thing that needs to be done is to choose what size we need to sew for each of us.
My daughter falls into size 7 for chest and waist and size 10 for height. Since we’re going to be shortening our pattern before adding the skirt, we don’t need to worry about using the height measurement for our tops. But we will need to take our height into consideration for our skirt sizes.
Once the sizes are picked we’ll print out our pattern. This can be done any way you prefer. If the pattern you are using has a projector file available and if you are comfortable making adjustments on strait from your projector you can skip any printing. I prefer to use a mix of paper and projector. I’m a very hands on person, so I LOVE having a paper pattern to touch and feel and move around my fabric, but I do not like printing and pasting a bunch of pages together. So I bought a roll of butcher paper and I use my projector to project the pattern onto the roll of paper and trace my pattern pieces and needed markings onto the butcher paper. I love that I can still have the paper patterns I love, but it cuts WAY down on the time it takes to print and paste all those pages together. This makes it easier to make any adjustments I need to make while and allows me to “puzzle” all the pieces onto the fabric better to get the most bang for my buck with my fabric. I like laying all my pieces out on my fabric before I start cutting and I just can’t do that easily using strictly my projector, so this gives me the best of both worlds!
 Preparing and Cutting our Pattern Pieces
While we are making our pattern pieces we’ll need to cut out or make an additional flounce pattern piece that we will adjust later.

The forever flounce is a pretty long top, so we’ll need to take away some of the length at the bottom to be able to add the skirt. This is slightly a personal preference on where you like your skirt to start on your dress. I prefer mine to start somewhere right around my waistline, maybe slightly lower depending on how I’m feeling. There are a few different ways you can get this measurement. You can use Forever Flounce top you already made and measure up from the bottom where I’d like your skirt to hit to find out how many inches you will need to take off. Or, if you haven’t made this top yet you can use a dress that has an attached skirt that falls how you like it and measure the bodice piece of that dress to find out how long your bodice piece should be, or you can hold your pattern piece up to your body and measure that way.
To get my daughter and my measurements I used a Staycation Dress I made recently for me and a School Cool Dress I made recently for my daughter.
I found that my bodice needs to be about 16 inches long and my daughter’s needs to be about 11 inches. So if we add a half inch to each of these measurements (¼ inch for seam allowance at each the top and the bottom) we’ll want to cut each of our bodice pieces to 16.5 inches and 11.5 inches long. Don’t forget to make this adjustment on each of the bodice pieces. We want to make sure to measure from the same spot we measured on our dress when we were getting the measurement.
 After we measure the first pattern piece we can just use the cut off part of the pattern piece and match it to the bottom of the other bodice pieces and transfer our cut line. I’m only showing the Adult version in my pics, but the Kid version will be done the same way.

Here are our bodice pieces for our dresses before and after this adjustment…

We’ll need to make these same adjustments on our flounce pieces as well. To do this, I used a ruler and followed the curve down around the inside line of the flounce pivoting the ruler as I go until I got to the measurement I needed (16.5 and 11.5 inches). Again, we’ll line up the bottom of our flounces and trace the line onto the other flounce.


To get the effect we’re wanting with our double flounces we’ll also need to adjust the width of our flounces to make the second one a little more than half the width the of the original flounce. The flounce for the size I’m making is 5” wide and gets wider when you get towards the middle. So I decided to cut about 2 inches off the width. You can eyeball this if you’d like or you can measure in increments going down the flounce and draw a line to cut on. I measured my flounce before I cut it. Be sure to measure from the outside of the flounce, not the inside or it will end up skinnier than we want. For the Kid’s version we will do the same thing. Measure the width of the flounce and pick a measurement you like that is more than half the original flounce width.

Now we have all of our bodice pieces ready to go and all that’s left to do is cut our skirt pieces. Since the skirt I chose (The Trendsetter Skirt) was drafted to sit higher around your waist already, I didn’t have to add any length to my skirt. If you are using a skirt that has been drafted to sit lower than you chose your bodice to fall, you will need to find the difference from where your bodice falls to where the skirt is drafted to fit and add those inches onto your skirt.
If your skirt comes with a waist (like the trendsetter skirt) dismiss this piece. We do not need to cut it out.
Starting to Sew
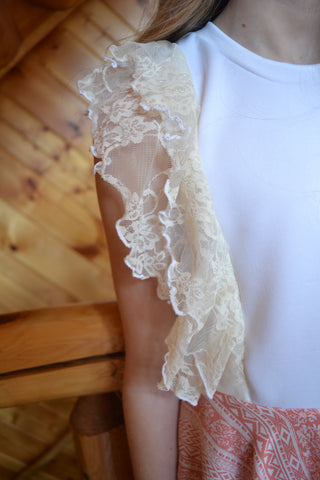
We’ll start by finishing our flounces if you choose to. These can be left unfinished as well. I choose to do a lettuce hem on mine.
One we have both sets of our flounces cut out of our fabric (one wide, one thinner) and hemmed if we chose to, we’ll want to clip them together at the inside edge. You can choose to serge or sew them together at this point if you’d like or you can leave them clipped. It’s your preference, but we will treat them as one piece from here on out. Repeat with both sets of flounces. (I forgot to hem mine before I clipped them together and had to go back to hem them later, so please ignore the fact that my pic below doesn’t have the appropriate hemming.)

Treating our flounces as one pieces as one, we will start to follow the tutorial for the Forever Flounce. When we come to the point in the tutorial of adding the flounces to our bodice, make sure your flounces lay so that your short flounce is on top when completed (the wider flounce should be on top when pinning the flounces right sides together to your bodice). I ALMOST made this mistake!

We’ll continue the rest of the way through The Forever Flounce tutorial to complete the bodice of our dress.
Once our bodice is complete we’ll start to sew our skirts. Follow the instructions in your tutorial to make the skirt (omitting any waistbands). For the Trendsetter Skirt, this involved adding pockets and then sewing the side seams together. And that was it! Depending on the skirt you chose, there may be some gathering involved as well.
When attaching the skirt to the bodice be sure to lay your flounces flat and spread outward along your bodice. Attach the skirt and bodice just as you would any skirt. Quarter out the bodice and skirt and match the side seams (if you have them). In this case, because of our high-low hem of our skirt, we need to make sure the front (hi/short hem) is lined up with the front of our bodice and the longer side of the skirt is lined up with the back of our bodice.
We’ll finish attaching our skirt to our bodice, hem our skirt and we’re finished with our dresses!


I love having matching dresses for my daughter and me! And I love making them slightly different by changing up the colors and sleeve choices slightly! We are both thrilled with how our dresses turned out and cannot wait for spring weather and spring get-togethers to come our way!
I hope this blog has inspired you! Please reach out to me if you have any questions!
(Written by: Sarah Lewis)