Hey there, fabulous sewists! Lindsey here, the creative brain behind Ellie and Mac Sewing Patterns, and I've got something super exciting to share with you today!
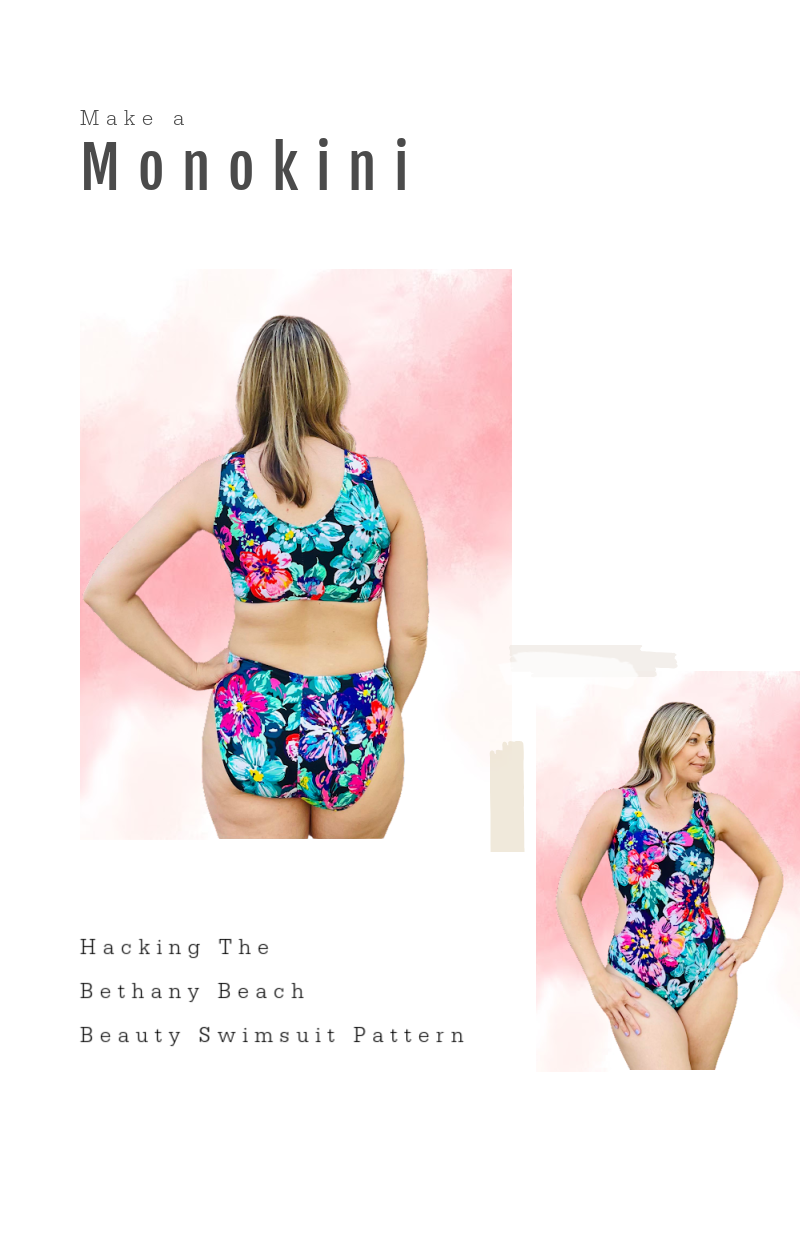
Picture this: it's a sunny day, you're at the beach, and you're rocking a swimsuit that makes you feel like a total beach babe. That's exactly how I felt when I whipped up the cutout version of our brand spanking new Bethany Beach Beauty Swimsuit. 😍
Now, let me spill the beans—I'll admit, I wasn't initially sold on the whole cutout trend. I mean, me? In a cutout swimsuit? It wasn't exactly in my usual style playbook. I'm more of a tankini or one-piece gal myself. But oh boy, did this one change my mind!
As I'm gracefully aging (like fine wine, of course), I've found myself gravitating more towards the comfort of a classic one-piece. But hey, that doesn't mean I'm ready to sacrifice style! That's where the magic of the Bethany Beach Beauty comes in.
So there I was, on a mission to find the perfect fabric for my new swimwear masterpiece. You know how it goes—Google search overload, with swimsuits from every corner of the internet popping up left and right. But then, bam! A monokini caught my eye, and the lightbulb moment hit me like a tidal wave. 🌊
I just knew I had to make it happen, and what better canvas to work with than our versatile Bethany pattern? With a few tweaks here and there, I transformed it into the coolest monokini you ever did see!
Alrighty, beach babes and sewing superheroes, it's time to dive into Step 1 of our swimsuit makeover mission! 🎉
First up, grab that Swimsuit Back pattern piece and get ready to work some magic.
Here's the scoop: we're gonna draw a line from the top of the cutout, straight across the pattern, and then repeat the process from the bottom of the cutout. It's all about creating that perfect canvas for our monokini masterpiece!
Check out my image below for a visual guide.

Ready, set, let's make those lines and unleash our inner swimsuit designer extraordinaire! Who's excited? 🙌🎨
Alright, my fabulous sewing squad, it's time to strut into Step 2 of our swimsuit transformation journey! 🌟
You will use the two pieces you made in Step 1 using the Swimsuit Back pattern piece to cut two mirrored back bodices and two mirrored back bikini bottom pieces. Cut the rest of your pattern pieces as instructed in the tutorial.
It's time to shimmy on over to Step 3 of our swimsuit sewing extravaganza! 💃
Now that you've got your mirrored back bodice pieces and mirrored back bikini bottom pieces all prepped and ready to roll, it's time to bring them together for a little rendezvous.
Place those back bodice pieces right sides together, because we're about to stitch 'em up and make some sewing magic happen! Get those seams aligned, fire up that sewing machine, and let's dive into some stitching action. ✂️
Once you've worked your sewing wizardry and those back bodice pieces are securely stitched, it's time to give 'em a little love with the iron. Grab your trusty iron, smooth out those seams, and let's keep this sewing party going strong!
And hey, don't forget to repeat the same process for those back bikini bottom pieces. You are doing great!
Alright, my fearless sewists, we're cruising right along to Step 4 of our swimsuit sewing saga!
Now that you've got your crotch liner all neatly basted on (following the tutorial like the sewing rockstars you are), it's time to take things up a notch!
Grab those Swimsuit Front pieces and those Swimsuit Back pieces—it's about to get real! With the right sides together, sew your swimsuit together at the shoulders, sides, and crotch.
If you're feeling extra fancy and want to add a little extra oomph to your swimwear creation, now's the time to tackle those shelf bra steps. Because why settle for basic when you can level up with a shelf bra, am I right?
So, whether you're sticking to the basics or taking the plunge into shelf bra territory, let's get those pieces sewn together and watch our swimsuit dreams come to life!
Alrighty, my sewing sensations, it's time to bust out the measuring tape because we're onto Step 5 of our swimsuit sewing adventure!
Now that you've worked your magic and stitched your swimsuit together like the pros you are, it's time to take a peek at what we've created. Picture-perfect seams, flawless stitching—yup, we're nailing it!
Take a gander at my photo below to see what your masterpiece should be looking like at this stage.

Now we're gonna bust out that measuring tape and hone in on the highlighted area like sewing detectives on a mission.
Take the total circumference of the yellow highlighted areas, the back bodice hem, both front side cutouts, and the waist of the back bikini bottom, and subtract a total of 6" from that number. This is the length you will cut a piece of 1/4" elastic. Now, sew that elastic into a loop and we are ready to go!
Alright, friends, we're on a roll! Let's start Step 6 with some elastic sewing!
First things first, grab that elastic and let's get to quartering. Divide that elastic into quarters so pinning it to your swimsuit will be a breeze.
Now, once you've got your elastic all quartered up and ready to roll, it's time to get pin-happy. Pin/clip the overlapped section of elastic to the wrong side of the center back seam of those bikini bottoms.
Pin the center front of the elastic to the center back seam of the back bodice hem. And don't forget to pin those middle points of the elastic to the center of each front cutout.
Now, here's where the magic happens. We're gonna sew that elastic to the wrong side, but we're not stretching it evenly. We want most of that stretch in the back to keep our swimsuit snug and secure.
So, take note—I decided to pin my elastic 1" less than each cutout. That means I pinned the elastic so that I'd only be stretching 1" on each one. Genius, right? Then the front and back get the most stretch, ensuring the perfect fit for all your beach adventures!
So grab your sewing machine or serger, follow those instructions to a T, and let's sew that elastic into place like the sewing bosses we are!
All that's left is to finish sewing our elastic to our neckline, legs, and armscyes. Don't forget to add that shelf bra, as instructed, if you are adding that fun option!

Drumroll, please! 🥁 Behold, my fabulous Monokini creation—ta-da! ✨ I've gotta say, I am absolutely smitten with how this turned out. It's like a burst of sunshine and creativity all rolled into one fabulous swimsuit!
From the sleek lines to the perfect fit, this Monokini is giving me all the beach vibes and then some. I can't wait to rock it on my next pool adventure and soak up the sun in style!
But hey, enough about me—now it's your turn! I want to see all the amazing creations you come up with using this tutorial. Whether you're sticking to the basics or adding your own unique flair, I know you're going to knock it out of the park!
So gather up your fabrics, fire up that sewing machine, and get ready to embark on your own swimwear sewing journey. Trust me, there's nothing quite like the feeling of slipping into something you've made with your own two hands.
I hope you had as much fun following along with this tutorial as I did creating it. Now go forth, my fellow sewing enthusiasts, and let's make some waves—both in the ocean and in the world of DIY fashion!